Introduction
In one of my Vue projects, I needed to generate word documents with different templates. I did a small R&D and came across several libraries and APIs to achieve this. All of them were not free and we have to buy a subscription which is very expensive for me. The available free libraries used an approach where we have to design the template with HTML first and then render them as a word document. This approach did not fit my need as there were many templates and they could frequently change as per the client’s need.
Finally, I came across a great library ( which was the only library available on the Internet) to generate word documents from a given template that includes tags that can be replaced with contemporary data when generating the report. It was a JavaScript library but my Vue project was in Typescript.
In this article, I am going to explain how to implement this feature easily with Vue.JS project in TypeScript. If you are new to Vue with TypeScript, please follow this article explaining how to create a new Vue.JS project in TypeScript. The others can proceed.
Installing necessary libraries
For generating the word document we use docxtemplater library by Edgar Hipp. First of all, run these commands in the console inside your project folder.
npm install --save docxtemplater
npm install --save jszip@2
npm install --save jszip-utils
npm install --save file-saver
In addition to the main library, we need the other libraries mentioned above in this process. File saver library is used to save the final output to the local machine.
Writing definition files for TypeScript
Some JavaScript libraries cannot be directly used in a TypeScript project if they do not include a type definition file for TypeScript. Type definition files usually appear as <libraryName>.d.ts and you can check if there is a such file in the installed library in the node_modules folder of the project.
Except for the docxtemplater library, the other three libraries do not include such definition files. Therefore, we have to write definition files for them separately by our own. These files are created, named according to the structure <libraryName>.d.ts and placed inside the src folder.
jszip.d.ts
declare module "jszip" {
  import jszip from 'jszip';
  export default JSZip;
}
jszip-utils.ts
declare module "jszip-utils" {
  import JSZipUtils from 'jszip-utils.js';
  export default JSZipUtils;
}
file-saver.d.ts
declare module "file-saver" {
  import { saveAs } from 'file-saver';
  export default saveAs;
}
After creating these files in the src folder, you can use these in any component.
Submitting the templates
First, you have to place your template document that is composed of tags, inside the public folder of the Vue project. The tags are written inside two curly brackets. ex:- {full_name} .
For this explanation, I have created my sample template and placed it inside a separate folder inside the public folder ( public → ReportTemplates → template-1.docx ).
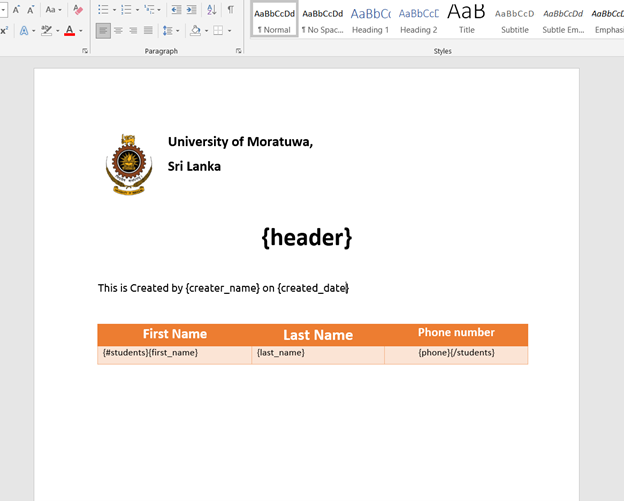
All inside the {} are tags and they are replaced by the JSON dataset provided when rendering. The tag name and the property name in the JSON object must be similar to run a replacement for a tag.
{#students}……{/students} inside a row of a table represents a list named “students” in the JSON object which we are going to provide when rendering.
For this example, this is the JSON dataset we will provide.
{
          "students": [
            {
              "first_name": "Udith",
              "last_name": "Indrakantha",
              "phone": "+94760000000"
            },
            {
              "first_name": "Chamal",
              "last_name": "Silva",
              "phone": "+94760000001"
            },
            {
              "first_name": "Tharindu",
              "last_name": "Jayasinghe",
              "phone": "+94760000002"
            },
            {
              "first_name": "Sanindu",
              "last_name": "Rathnayake",
              "phone": "+94760000003"
            },
            {
              "first_name": "Pramodi",
              "last_name": "Samaratunga",
              "phone": "+94760000004"
            },
            {
              "first_name": "Samanthika",
              "last_name": "Rajapaksha",
              "phone": "+94760000005"
            }
          ],
          "creater_name": "Udith Gayan Indrakantha",
          "created_date": "22/12/2020",
          "header": "Some Students' Details"
}
Writing the component
This is how my final component code appears. When I click the button, it downloads the final word document in docx format with the hardcoded dataset in JSON format. Normally, you should call your back-end API and fetch this dataset for the report.
<template>
  <div>
    <button @click="getDoc">Download Word Document</button>
  </div>
</template>

<script lang="ts">
/* eslint-disable */
  import { Component, Prop, Vue } from "vue-property-decorator";
  import docxtemplater from 'docxtemplater';
  import JSZip from 'jszip';
  import JSzipUtils from 'jszip-utils';
  import  saveAs  from 'file-saver';
  @Component(
    {
      components: {
      }
    }
  )
  export default class ReportComponent extends Vue {
    getDoc() {
      this.createAndSaveDocument();
    }
    loadFile(url: any,callback: any){
        JSzipUtils.getBinaryContent(url,callback);
    }
    createAndSaveDocument(){
        /*
        *   This required JSON dataset must be fetched from the backend API.
        *   The tags in the template will be replaced by these data.
        *   For demonstrations, I have hardcoded the tesdt dataset
        */
        let dataset = {
          "students": [
            {
              "first_name": "Udith",
              "last_name": "Indrakantha",
              "phone": "+94760000000"
            },
            {
              "first_name": "Chamal",
              "last_name": "Silva",
              "phone": "+94760000001"
            },
            {
              "first_name": "Tharindu",
              "last_name": "Jayasinghe",
              "phone": "+94760000002"
            },
            {
              "first_name": "Sanindu",
              "last_name": "Rathnayake",
              "phone": "+94760000003"
            },
            {
              "first_name": "Pramodi",
              "last_name": "Samaratunga",
              "phone": "+94760000004"
            },
            {
              "first_name": "Samanthika",
              "last_name": "Rajapaksha",
              "phone": "+94760000005"
            }
          ],
          creater_name: "Udith Gayan Indrakantha",
          created_date: "22/12/2020",
          header: "Some Students' Details"
        };
        /* *
        * The template's path must be passed as an arguement .
        * This path can be either a URL(as  in the commented line) or a path relative to the Public folder
        * For testing, I have created a folder named  "ReportTemplates" inside the public folder and it contains my sample
        * template named "template1.docx" .
        * */
        // this.loadFile("https://docxtemplater.com/tag-example.docx",function(error: any,content : any){
          this.loadFile('ReportTemplates/template-1.docx',function(error: any,content : any){
            if (error) {
              throw error
            };
            let zip = new JSZip(content);
            let doc = new docxtemplater().loadZip(zip)
            doc.setData(dataset)
            try {
                doc.render()
            }
            catch (error) {
                let e = {
                    message: error.message,
                    name: error.name,
                    stack: error.stack,
                    properties: error.properties,
                }
                console.log(JSON.stringify({error: e}));
                // The error thrown here contains additional information when logged with JSON.stringify (it contains a property object).
                throw error;
            }
            // docx generating
            let out = doc.getZip().generate({
                type:"blob",
                mimeType: "application/vnd.openxmlformats-officedocument.wordprocessingml.document",
                })
            saveAs(out,`MyDocument.docx`);    // You can pass this blob to a custom file saver component in the project.
        });
    }
  }
</script>


<style scoped lang="scss">
</style>
n line 82, for the loadFile function’s first parameter, you can give the path of the template relative to the public folder.
Or
As in line 81 (commented), you can pass a URL too. This can be from a server or a cloud storage too.
JSUtils library is used here to read the binary content from the template document and prepare it in a way that can be zipped. JSZip library is used to create the zipped content . The docxtemplater library requires the template as a zipped content. That is why we use other two libraries in the process.
In line 89, you can see that I have set the JSON dataset to the document. This dataset can be as mentioned earlier, from an API.
In line 113, saveAs function exported in file-saver.js library, has been used to download the blob with a given file name ( here it is MyDocument.docx ).
I have put some useful comments too in the above code, so that you can modify the code as you wish.
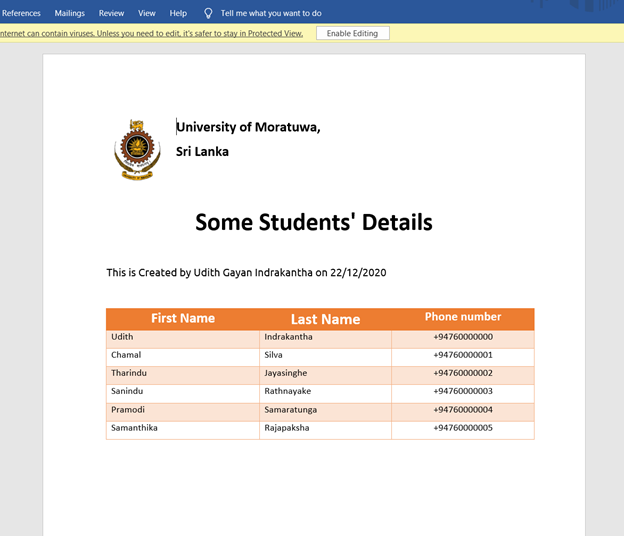
Final Output
After submitting the templates, creating the definition files, and writing the Vue component, we can download the nice word document below.
What else can we do with this library?
Only word documents with “.docx” can be generated in the free version. ( commercial version supports for pptx and xlsx generation too)
The free version supports the features below, which are sufficient to generate good looking impressive reports in your project.
-
Filling data in tables ( As in the example we discussed)
-
Repeating a section in the word document with a given list of objects. (Loops)
-
Conditional Rendering of tags by enabling the angular parser option.
-
Creating a loop-list
You can test these features at the Demo Section of their official page.
Conclusion
I explained how to use this docxtemplater library with a Vue.JS project in TypeScript. With this approach, the frequent changes of the templates can be accommodated while the tag names are kept unchanged . This is one of the most advantageous libraries I have come across so far and I am sure it will be same for you one day.
If you have any issue or a question regarding this, please do not hesitate to use the comment section.
Thank you for reading & happy coding!
..................................
If you have any difficulty in reading this here, please visit my article on medium.