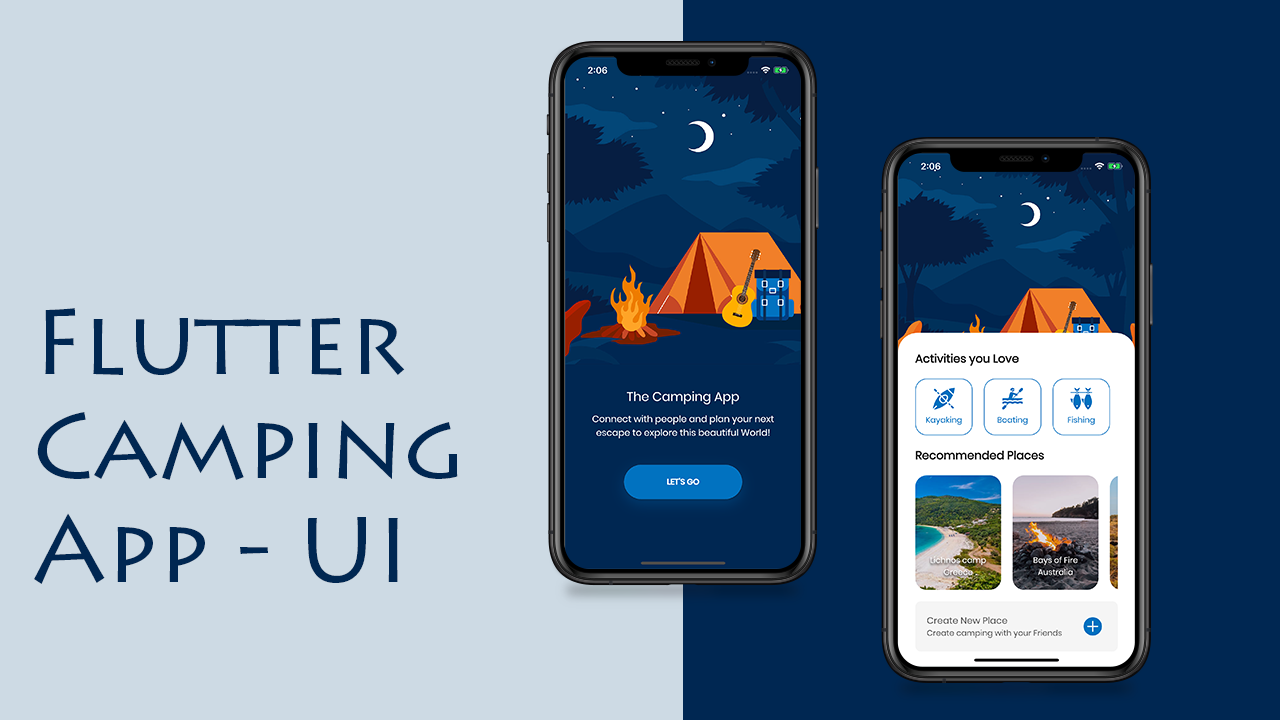
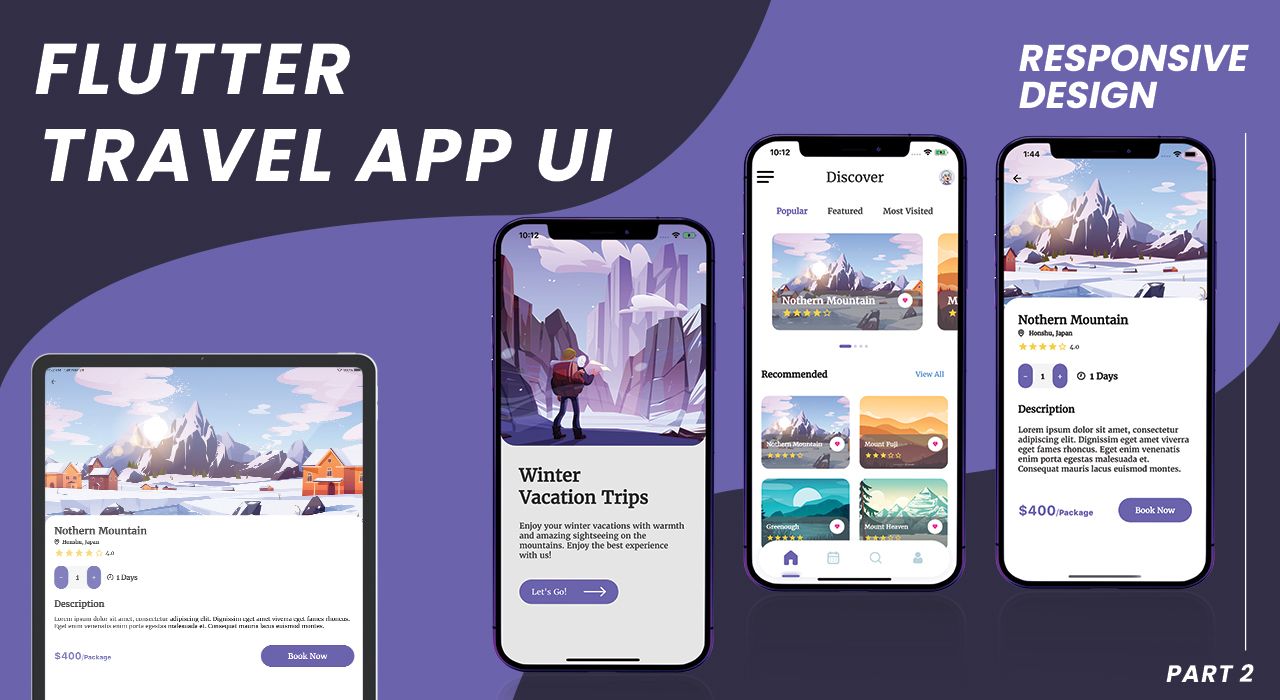
Let's learn to build this Camping App using Flutter 👇 👇
YouTube - https://youtu.be/Po2yjva9iic
Link to Source Code can be found on YouTube Video description.
Give me support by 👇 👇
✅ Subscribe ✅ Share ✅ Comment & Stay Connected!
Let's learn to build this Camping App using Flutter 👇 👇
YouTube - https://youtu.be/Po2yjva9iic
Link to Source Code can be found on YouTube Video description.
Give me support by 👇 👇
✅ Subscribe ✅ Share ✅ Comment & Stay Connected!
Hello guys, in this post i'll show you how to deploy your ionic 4/5 app as a web app on Firebase.
In this tutorial i'm assuming you have installed firebase-tools and you have created firebase project on firebase console.
Let's dive :swimmer:
Open your terminal and cd to your root of ionic project
Then run ionic build —prod —release
If you want to run and see before deploying you can install http-server from npm and run,
cd www/http-server .Then initilize firebase by running firebase init
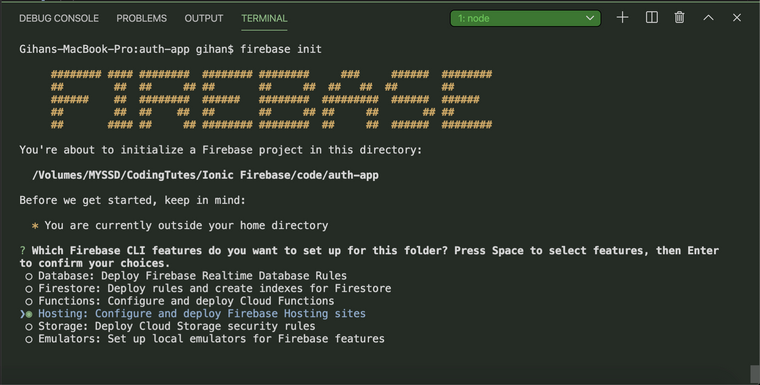
Choose Hosting: Configure and deploy Firebase Hosting sites option (press space bar to choose) and press Enter
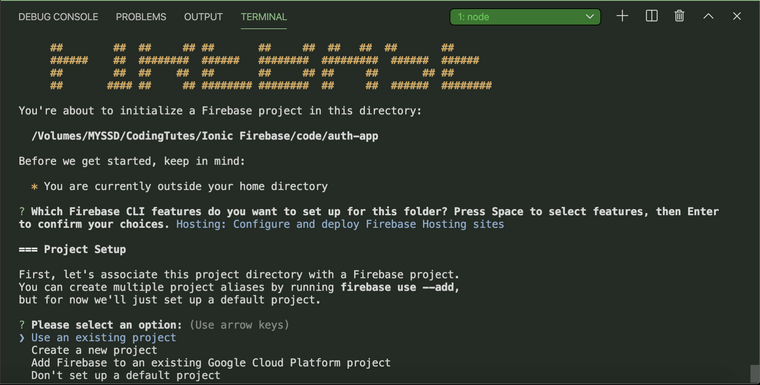
Now choose Use an existing project and select your project
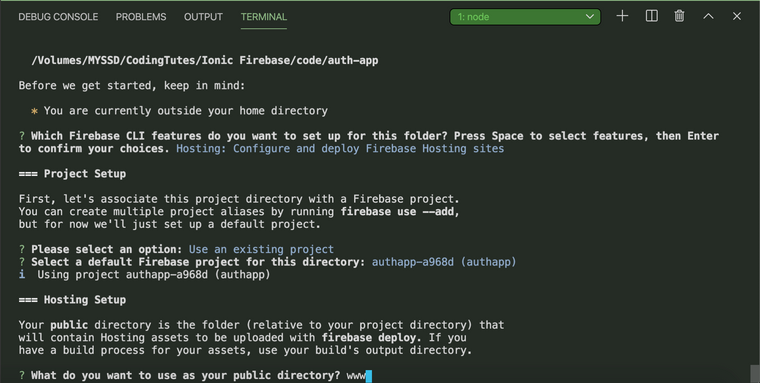
For this enter www as public directory
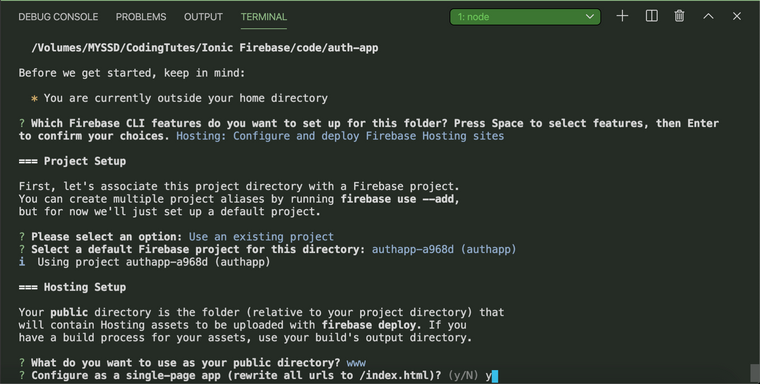
For next question enter **y **and for final question enter N.
Now firebase has initilized on our project directory, you will see two nes files as firebase.json & .firebaserc, it means firebase has initialised, let's move on
Now run firebase deploy this command will deploy our app to firebase, after successfull deploy you will see like below.
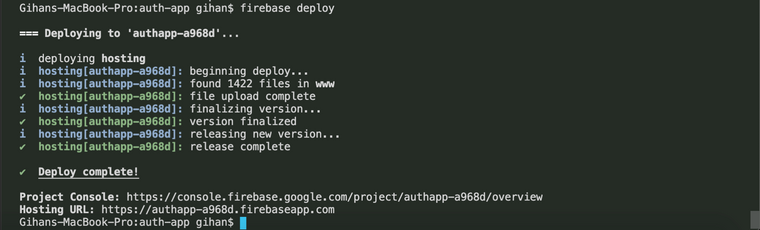
Visit your newly hosted web app by going to **Hosting URL
When talking about Laravel Framework, Eloquent is a one of best part of the framework, have you ever thought of using Eloquent without entire Laravel framework? In this post i'm teaching you how to use Eloquent ORM without Laravel Framework, i'll create simple form using Eloquent. Let's dive,
Required Environment
Setting up Eloquent in PHP
First move to empty folder on public directory and run below command on terminal.
composer require illuminate/database
This will generate composer.json and install eloquent dependency on our project directory.
After command successful, create a new file and name it bootstrap.php and put below code in it,
<?php

require "vendor/autoload.php";

use Illuminate\Database\Capsule\Manager as Capsule;

$capsule = new Capsule;

// Mysql serve credentials
$capsule->addConnection([
   "driver" => "mysql",
   "host" =>"127.0.0.1",
   "database" => "ums",
   "username" => "root",
   "password" => "123"
]);

// Making Capsule instance available globally
$capsule->setAsGlobal();

// Booting the Eloquent ORM
$capsule->bootEloquent();
The code requiring composer autoload class and importing Eloquent Manager and making it's instance called $capsule. In next line we setting database connection and making it available globally using $capsule instance, finally we're booting the Eloquent ORM.
After this create a database on your localhost and name it ums
Creating Migrations
Migration is used to build your application database schema, in Laravel we use artisan commands to generate migrations and run them, so let's see how we can use migrations without Laravel Framework and artisan commands.
Now create a folder called database and create user_table_migration.php inside the newly created folder and put below code
<?php

require "../bootstrap.php";

use Illuminate\Database\Capsule\Manager as Capsule;

Capsule::schema()->create('users', function ($table) {
    $table->increments('id');
    $table->string('name');
    $table->string('email')->unique();
    $table->string('password');
    $table->timestamps();
});
You can see a some similarity of this code and what we would write in Laravel, the difference is the schema is reference from Capsule class.
Now our migration for users table is ready, to run this migration simply open user_table_migration.php file on browser if you see a blank page, it means script executed successfully, to verify check your database, there should be users table created.
Note - Since these migration scripts publicly available, this is not suitable for Production use
Creating Models
Let's see how we implement Eloquent Models, first create a new folder and name it models, then open composer.json and edit it like below code
{
    "require": {
        "illuminate/database": "^7.5"
    },
    "autoload": {
        "classmap": [
            "models"
        ]
    }
}
This will add our models folder as autoload, now create a new file inside models folder and name it User.php
<?php

use Illuminate\Database\Eloquent\Model as Eloquent;

class User extends Eloquent
{
   /**
   * The attributes that are mass assignable.
   *
   * @var array
   */
   protected $fillable = [
       'name', 'email', 'password'
   ];

   /**
   * The attributes that should be hidden for arrays.
   *
   * @var array
   */
   protected $hidden = [
       'password',
   ];
 }
Now our Eloquent Models are ready to use, let's create form to insert data.
Create a new file in the root of the project and name it index.php, then put below code
<?php
    session_start();

    $error = isset($_SESSION['error']) ? $_SESSION['error']:true;
?>
<!DOCTYPE html>
<html lang="en">
<head>
    <meta charset="UTF-8">
    <meta name="viewport" content="width=device-width, initial-scale=1.0">
    <title>Create User</title>

    <link rel="stylesheet" href="https://stackpath.bootstrapcdn.com/bootstrap/4.4.1/css/bootstrap.min.css" integrity="sha384-Vkoo8x4CGsO3+Hhxv8T/Q5PaXtkKtu6ug5TOeNV6gBiFeWPGFN9MuhOf23Q9Ifjh" crossorigin="anonymous">

    <style>
        #bg-cover {
            background-size: cover;
            height: 100%;
            text-align: center;
            display: flex;
            align-items: center;
            position: relative;
        }

        #bg-cover-caption {
            width: 100%;
            position: relative;
            z-index: 1;
        }

        /* background overlay */
        form:before {
            content: '';
            height: 100%;
            left: 0;
            position: absolute;
            top: 0;
            width: 100%;
            background-color: rgba(0,0,0,0.3);
            z-index: -1;
            border-radius: 10px;
        }
    </style>
</head>
    <body>
        <section id="bg-cover" class="min-vh-100">
            <div id="bg-cover-caption">
                <div class="container">
                    <div class="row text-white">
                        <div class="col-xl-5 col-lg-6 col-md-8 col-sm-10 mx-auto text-center form p-4">
                            <h1 class="display-4 py-2 text-truncate">Create User</h1>
                            <div class="px-2">
                                <form action="save_user.php" method="POST" class="justify-content-center">
                                    <div class="form-group">
                                        <label class="sr-only">Name</label>
                                        <input type="text" name="name" class="form-control" placeholder="Name" required>
                                    </div>
                                    <div class="form-group">
                                        <label class="sr-only">Email</label>
                                        <input type="email" name="email" class="form-control" placeholder="Email" required>
                                    </div>
                                    <div class="form-group">
                                        <label class="sr-only">Password</label>
                                        <input type="password" name="password" class="form-control" placeholder="Password" required>
                                    </div>

                                    <button type="submit" class="btn btn-primary btn-lg">Create</button>

                                    <?php
                                        if ($error == false) {
                                            echo '<span>User added</span>';
                                        }
                                    ?>
                                </form>
                            </div>
                        </div>
                    </div>
                </div>
            </div>
        </section>

        <script src="https://code.jquery.com/jquery-3.4.1.slim.min.js" integrity="sha384-J6qa4849blE2+poT4WnyKhv5vZF5SrPo0iEjwBvKU7imGFAV0wwj1yYfoRSJoZ+n" crossorigin="anonymous"></script>
        <script src="https://cdn.jsdelivr.net/npm/[email protected]/dist/umd/popper.min.js" integrity="sha384-Q6E9RHvbIyZFJoft+2mJbHaEWldlvI9IOYy5n3zV9zzTtmI3UksdQRVvoxMfooAo" crossorigin="anonymous"></script>
        <script src="https://stackpath.bootstrapcdn.com/bootstrap/4.4.1/js/bootstrap.min.js" integrity="sha384-wfSDF2E50Y2D1uUdj0O3uMBJnjuUD4Ih7YwaYd1iqfktj0Uod8GCExl3Og8ifwB6" crossorigin="anonymous"></script>
    </body>
</html>
Here i'm using bootstrap for frontend, now our form is ready. Then we need another php script to handle form submit so create another file and name it save_user.php and put below code,
<?php
ini_set('display_errors', 1);
ini_set('display_startup_errors', 1);
error_reporting(E_ALL);

session_start();

require "bootstrap.php";

$name = $_POST['name'];
$email = $_POST['email'];
$password = password_hash($_POST['password'], PASSWORD_BCRYPT);

$user = User::create([
    'name' => $name,
    'email' => $email,
    'password' => $password,
]);

$_SESSION['error'] = false;

header('Location: index.php');
This will handle our form submit event and insert the data to database using Eloquent. Finally open your terminal and run below command,
composer dump-autoload -o
This will generate optimised autoload files for our project. Now open index.php from browser and enter some info into form and see what happened.
Project files can found here
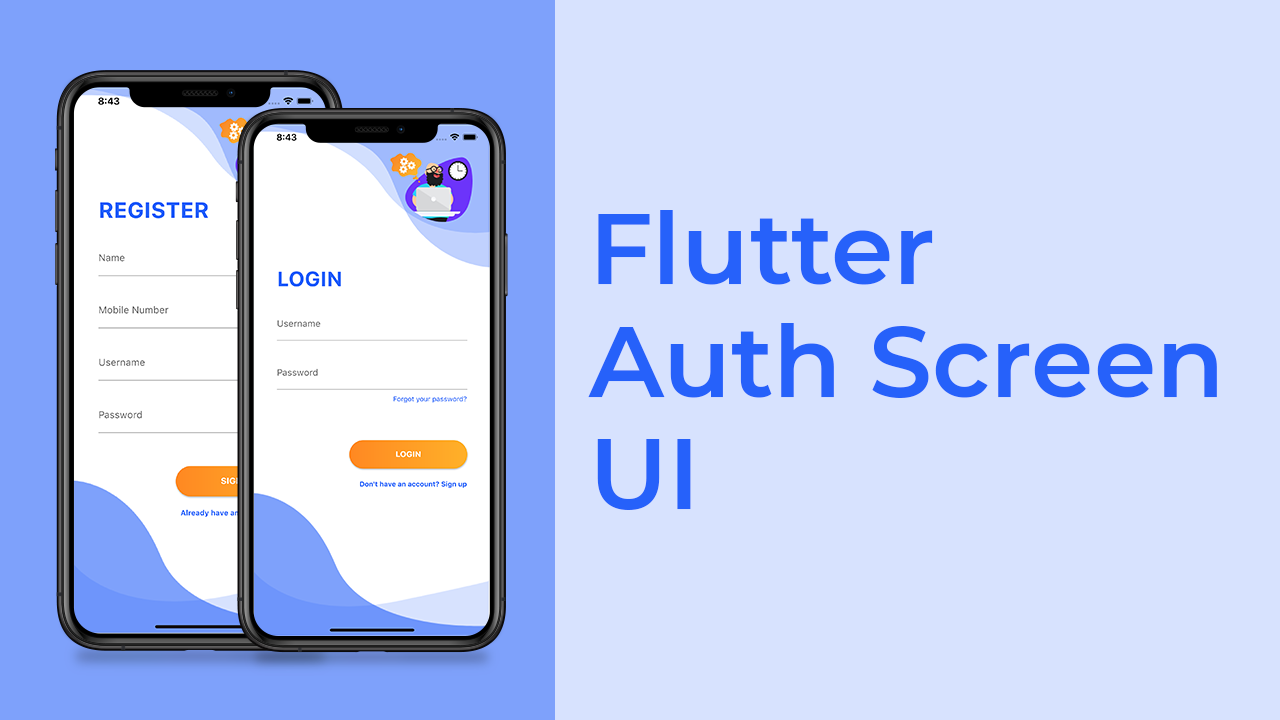
Flutter UI Series started, watch my first video on YouTube :point_down: :point_down:
Source Code - https://github.com/gihan667/flutter-login-ui
Coming up episodes will be updated here, stay connected.
Give me support by 👇 👇
✅ Subscribe ✅ Share ✅ Comment & Stay Connected!
@Tharinda ow machn vue walath auto reload tynwa, me link ekt ghn blnna official documentation eka https://vue-loader.vuejs.org/#what-is-vue-loader
you can attach event listener like below
app.on('myCustomEvent', function (a, b) {
  console.log(a); // -> 'foo'
  console.log(b); // -> 'bar'
});
and emit event like below
app.emit('myCustomEvent', 'foo', 'bar');
also check their documentation
Watch on YouTube: https://youtu.be/87dPve_-yqE
Source Code link in the Video Description
Make sure to Like + Subscribe! 😍
Hi, try below query, replace YOUR_LAT and YOUR_LNG with your current position and change DISTANCE_IN_MILE as you required
select * from locations where lat!='' and lng!='' and ( 3959 * acos( cos( radians(YOUR_LAT) ) * cos( radians( lat ) ) * cos( radians( lng ) - radians(YOUR_LNG) ) + sin( radians(YOUR_LAT) ) * sin( radians( lat ) ) ) ) < DISTANCE_IN_MILE
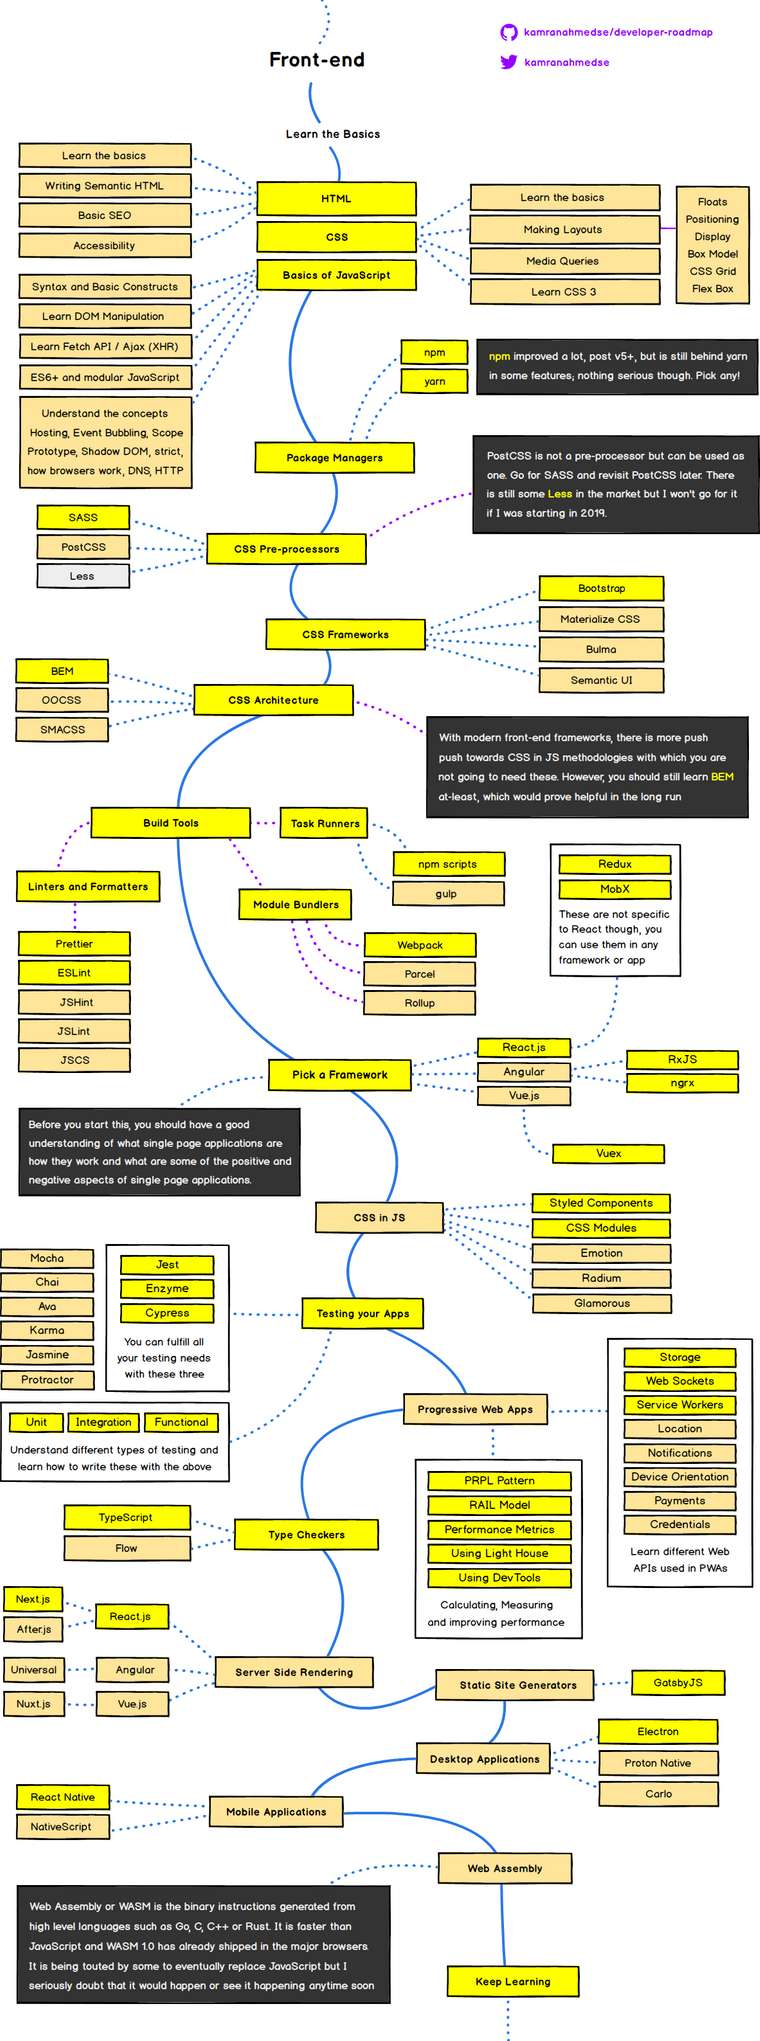
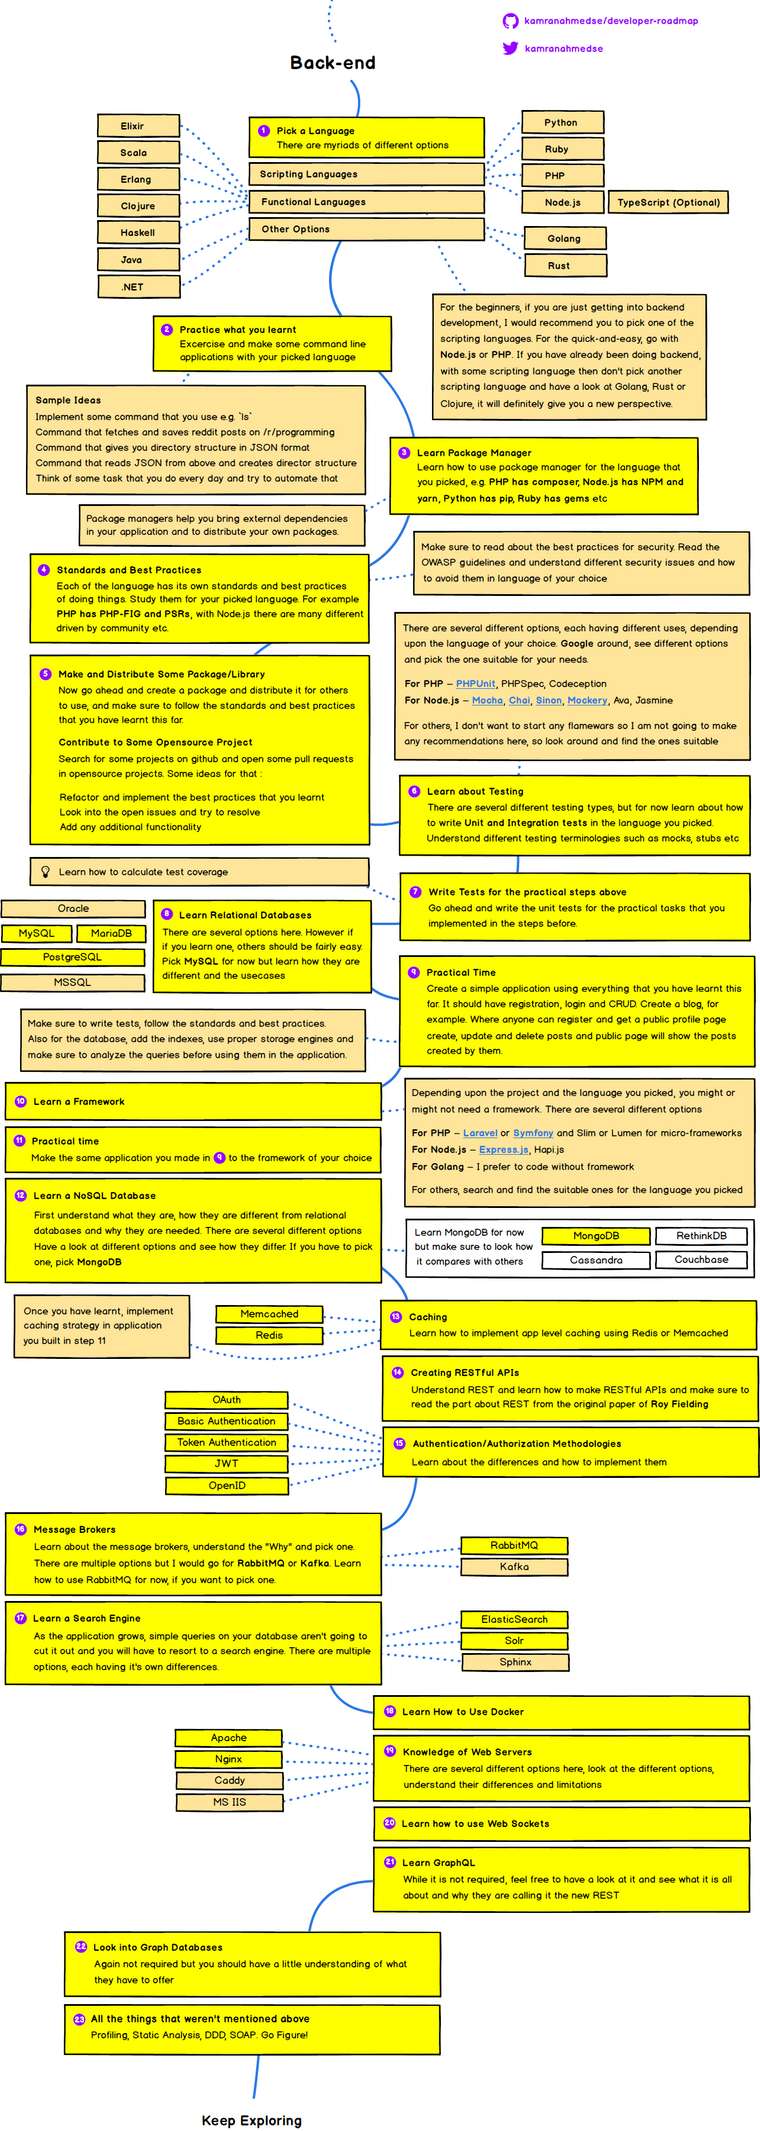
Introduction
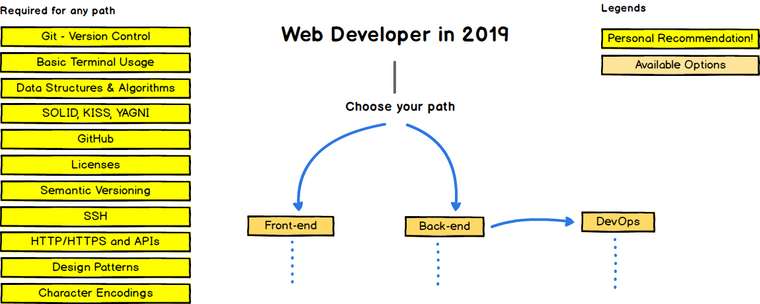
Frontend Roadmap
Back-end Roadmap
DevOps Roadmap
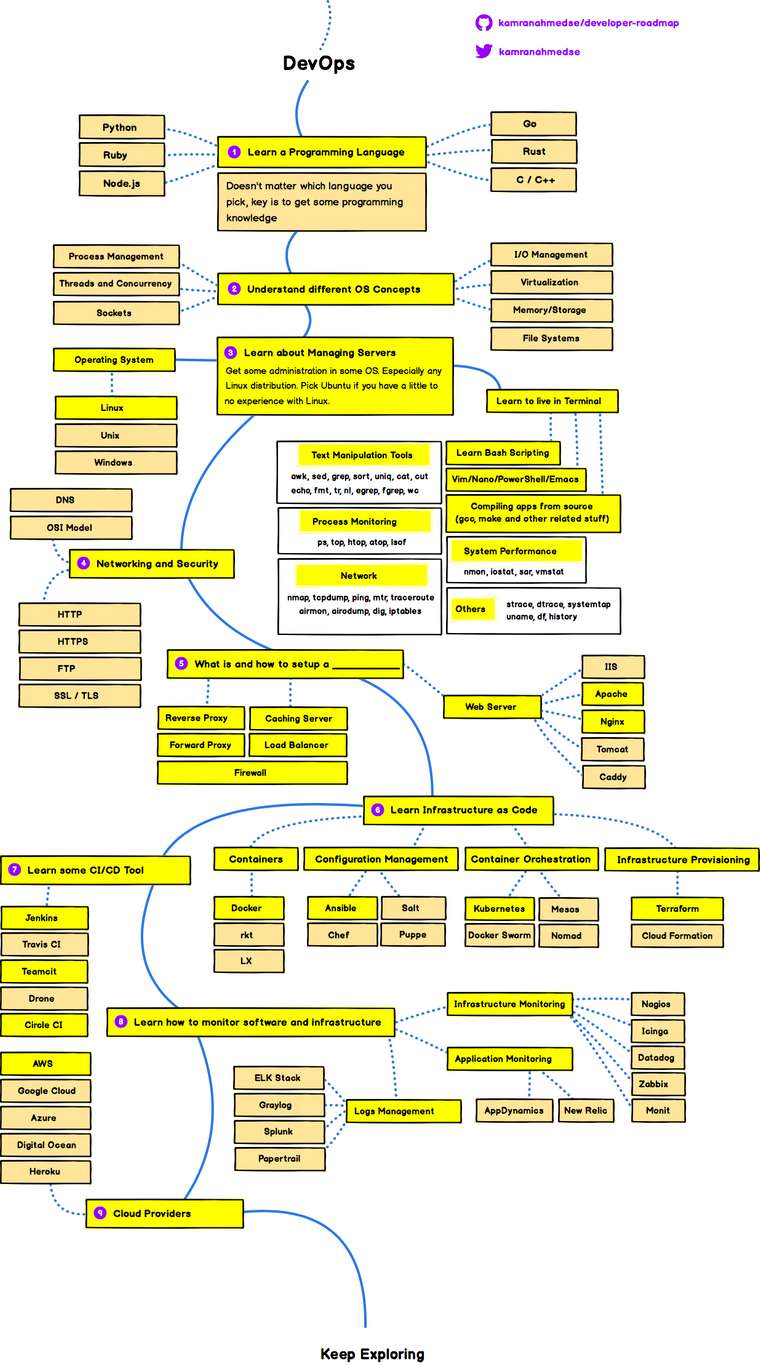
Reference - https://github.com/kamranahmedse/developer-roadmap
oyage code eke RegisterUser kyna model eke new object ekk hdnwa witarai, ekata values add krnne nha oya ekai error ekk enne, mehema try krnna
registeruser::create($request->all());
@firewalker you can run a python script in PHP like below -
<?php

$command = escapeshellcmd('/usr/python/myscript.py');
$output = shell_exec($command);
echo $output;

?>
Remember to add below line to top of myscript.py
#!/usr/bin/env python
Also python script needs correct priviliges and execution permission, and all the commands in python script needs correct priviliges. (For ubuntu server)
danata tyena timezone eka balanna
SELECT @@global.time_zone;
aluth time zone ekak set krnna (ekak query ekak use karanna)
SET GLOBAL time_zone = '+8:00';
SET GLOBAL time_zone = 'Europe/Helsinki';
SET @@global.time_zone = '+00:00';
Hoda idea ekak, api kohomath meetup ekak plan karala thibbe march wala wage tiyanna, api forum eke dannam meetup eka tiyaddi ❤
I created an android app to list best quotes for several categories, you can simply find quotes as per your need and share on social medias or copy it.

Support me by downloading and reviewing the app.
Download it on Play Store - Click Here
Thank you.
If you're prefering web development software engineering is the best path
machn location eka track krnna background service ekak hdlda tyenne?? app eka background ekt gyamada location updates enne natte?
in your saveData() method
function saveData() {
        var confirmed = document.getElementById('confirmed').checked ? 1 : 0;
        var id = document.getElementById('id').value;
        var Condition=$('input[name= Condition]:checked').val(); //get the radio button value like this, it's easy to use jquery than javascript

        var fd = new FormData();

        fd.append('confirmed', confirmed);
        fd.append('id', id);
        fd.append('Condition',Condition); //uncomment this line
}