Lanka Developers Community

    Lanka Developers

    • Register
    • Login
    • Search
    • Categories
    • Recent
    • Tags
    • Popular
    • Users
    • Groups
    • Shop
    1. Home
    2. dev_lak
    3. Best
    • Profile
    • Following 5
    • Followers 28
    • Topics 31
    • Posts 460
    • Best 151
    • Controversial 0
    • Groups 3

    Best posts made by dev_lak

    • Ionic Framework Intro

      0_1547220209312_start-using-ionic-00001.jpg

      What is Ionic Framework

      Ionic is a complete open-source SDK for hybrid mobile app development created by Max Lynch, Ben Sperry and Adam Bradley of Drifty Co. in 2013. The original version was released in 2013 and built on top of AngularJS and Apache Cordova. The more recent releases, known as Ionic 3 or simply "Ionic", are built on Angular. Ionic provides tools and services for developing hybrid mobile apps using Web technologies like CSS, HTML5, and Sass. Apps can be built with these Web technologies and then distributed through native app stores to be installed on devices by leveraging Cordova.

      Installing Ionic


      Ionic apps are created and developed primarily through the Ionic command line utility (the “CLI”), and use Cordova to build/deploy as a native app. This means we need to install a few utilities to get developing.

      Installing Node and NPM

      The quickest way to get Node and NPM installed on your machine is through the NodeJS installer. After installing open a terminal and run npm --version and node --version to verify you have everything installed correctly.

      Installing Ionic CLI

      Run below command on your terminal

      $ npm install -g ionic cordova

      Note: The -g means this is a global install, so for Windows you will need to open an Admin command prompt. For Mac/Linux, you might need to run the command with sudo.
      

      Creating Ionic App


      To create a blank app run below command

      ionic start helloWorld blank

      • start will tell the CLI create a new app.
      • helloWorld is the App name.
      • blank is starter template

      Along with the blank template, Ionic also provides the following official templates:

      tabs : a simple 3 tab layout
      sidemenu: a layout with a swipable menu on the side
      blank: a bare starter with a single page
      super: starter project with over 14 ready to use page designs
      tutorial: a guided starter project

      If you don’t specify a template at the start, you will be prompted to pick one.

      Running our App


      To run your app, cd into the directory that was created.

      $ cd helloWorld
      $ ionic serve

      In the next article i'll go over the project structure created by the ionic start command

      References


      Official Ionic Framework Docs

      posted in Hybrid App Development
      dev_lak
      dev_lak
    • RE: How to write regex with javascript

      try, /[a-zA-Z]{8}[_]{1}[0-9]{7}$/g

      posted in Web Development
      dev_lak
      dev_lak
    • React JS Intro

      0_1545988991425_reac.png

      What is React JS

      • React is a JavaScript library for building user interfaces.

      React Components

      • Everything in React is a component, and these usually take the form of JavaScript classes. You create a component by extending upon the React-Component class.
        Eg:

        class MyComponent extends React.Component {
            render() {
                return <h1>Hello world!</h1>;
            }
        }
        
      • You then define the methods for the component. In our example, we only have render() method.

      • Inside render() you’ll return a description of what you want React to draw on the page. In the case above, we simply want it to display an h1 tag with the text Hello world! inside it.

      Props and States

      • There are two types of data in React: props and state.

      • The key difference is that state is private and can be changed from within the component itself. Props are external, and not controlled by the component itself. It’s passed down from components higher up the hierarchy, who also control the data.

      • The difference between the two is a bit tricky to understand in the beginning, so don’t worry if you find it a bit confusing. i'll show you how to work with props and states in the next tutorial.

      Setting Up

      • First create a .html file

      • Then import react like below

        <!-- ... other HTML ... -->
        
          <!-- Load React. -->
          <!-- Note: when deploying, replace "development.js" with "production.min.js". -->
          <script src="https://unpkg.com/react@16/umd/react.development.js" crossorigin>    </script>
          <script src="https://unpkg.com/react-dom@16/umd/react-dom.development.js" crossorigin></script>
        
        </body>
        

      Add a DOM Container to the HTML

      • Add an empty <div> tag to mark the spot where you want to display something with React. For example:

        <!-- ... existing HTML ... -->
        
        <div id="save_button_container"></div>
        
        <!-- ... existing HTML ... -->
        
      • We gave this <div> a unique id HTML attribute. This will allow us to find it from the JavaScript code later and display a React component inside of it.

      Creating a React Component

      • Create a file called save_button.js next to your HTML page.

      • Add below code to save_button.js file

        'use strict';
        
        const e = React.createElement;
        
        class SaveButton extends React.Component {
          constructor(props) {
            super(props);
            this.state = { saved: false };
          }
        
          render() {
            if (this.state.liked) {
              return 'You saved this.';
            }
        
            return e(
              'button',
              { onClick: () => this.setState({ saved: true }) },
              'Save'
            );
          }
        }
        
        //These two lines of code find the <div> we added to our HTML in the last step, and then display our “Save” button React component inside of it.
        const domContainer = document.querySelector('#save_button_container');
        ReactDOM.render(e(SaveButton), domContainer);
        

      Loading our React Component

      <!-- ... other HTML ... -->
      
        <!-- Load our React component. -->
        <script src="save_button.js"></script>
      
      </body>
      
      • Open the .html file you create using your favourite browser and you will see something like below:

      0_1545987958832_d79088ee-6b1c-4907-a2d8-1bdf0470a236-image.png

      Full Example

      • index.html

        <html>
        <head>
            <title>React App</title>
        </head>
            <body>
                <h1>Welcome to my React App</h1>
                <div id="save_button_container"></div>
        
                <!-- Load React. -->
                <!-- Note: when deploying, replace "development.js" with "production.min.js". -->
                <script src="https://unpkg.com/react@16/umd/react.development.js" crossorigin></script>
                <script src="https://unpkg.com/react-dom@16/umd/react-dom.development.js" crossorigin></script>
        
                <!-- Load our React component. -->
                <script src="save_button.js"></script>
            </body>
        </html>
        
      • save_button.js

        'use strict';
         
        const e = React.createElement;
         
        class SaveButton extends React.Component {
          constructor(props) {
            super(props);
            this.state = { saved: false };
          }
         
          render() {
            if (this.state.liked) {
              return 'You saved this.';
            }
         
            return e(
              'button',
              { onClick: () => this.setState({ saved: true }) },
              'Save'
            );
          }
        }
         
        //These two lines of code find the <div> we added to our HTML in the last step, and then display our “Save” button React component inside of it.
        const domContainer = document.querySelector('#save_button_container');
        ReactDOM.render(e(SaveButton), domContainer);
        

      Thanks for reading, in the next tutorial i'll talk about

      • Props and States
      posted in Front-End Development
      dev_lak
      dev_lak
    • Firebase Cloud function to send emails via SendGrid

      In this post i'm showing you how to send emails via firebase cloud functions by SendGrid. SendGrid is a cloud based email service it has free tier which will help you to begin. Also we have to enable firebase billing to work this correctly, because firebase free plan only allow google services for outbound networking.

      For this tutorial i'm assuming you have installed firebase sdk and log into your firebase account.

      Setting up things

      1. Open terminal & run firebase init to initilize firebase functions
      2. We need two packages for this, add them via npm
        1. npm install @sendgrid/mail
        2. npm install cors
      3. Now open index.js and put below code.
      const functions = require('firebase-functions');
      
      const admin = require('firebase-admin');
      admin.initializeApp();
      
      const SENDGRID_API_KEY = "PUT_YOUR_SENDGRID_API_KEY";
      
      const sgMail = require('@sendgrid/mail');
      const cors = require("cors")({
        origin: true
      });
      
      exports.sendEmail = functions.https.onRequest((req, res) => {
      	return cors(req, res, () => {
        	const msg = {
            to: req.body.email,
            from: '[email protected]',
            subject:  'SUBJECT',
            templateId: 'd-02d153b9f48f490bb73bfcc6ad92d892', //SendGrid Template ID
            // SendGrid Template Variables
            dynamic_template_data: {
              name: req.body.name,
              event_name: req.body.event,
              date: req.body.date
            }
          };
          
          sgMail.send(msg).then(res => {
            res.send({
              success: true,
              message: res
            });
          }).catch(err => {
            res.send({
              success: false,
              error: err
            });
          });
        });
      });
      
      1. Now deploy our function by running firebase deploy --only functions

      NOTE - To work this correctly, you must enable billing on your firebase account

      posted in Programming
      dev_lak
      dev_lak
    • Flutter Ecommerce App UI

      thumbnail.jpg

      Flutter Ecommerce App UI

      Watch the full tutorial - https://youtu.be/bCAOaP5O2UY

      Don't forget to subscribe the channel!

      posted in Flutter
      dev_lak
      dev_lak
    • Flutter Spotify App Redesigned

      thumb (1).png

      Redesigning Spotify Home Page Using Flutter

      Watch full video on Youtube :point_right: https://youtu.be/HwDDF9e_vJQ

      Link to Source Code can be found on YouTube Video description.

      Give me support by 👇 👇
      ✅ Subscribe ✅ Share ✅ Comment & Stay Connected!

      posted in Mobile Application Development
      dev_lak
      dev_lak
    • Basic SEO for Web Developers Part 1

      Important HTML Elements

      1. Title Tag

      <head> 
          <title>Page Title</title>
      </head>
      

      Best Practices

      • Less than 512px (50-70 characters)
      • Important keywords near the beginning
      • Each title should be unique

      2. Meta Description Tag

      <head>
          <meta name="description"content="This is an example.">
      </head>
      

      Best Practices

      • Best under 155 characters
      • Each description should be unique
      • Well written descriptions influenceclick-through rate

      3. Images

      <img src="img/keyword.jpg" alt="keyword" width="100" height="100">
      

      4. Hyperlinks

      1. Text Link

        <a href="https://www.example.com/webpage.html">Keyword in Anchor Text</a>
        
      2. NoFollowed Link

        <a href="https://www.example.com/webpage.html" rel="nofollow">Keyword in Anchor Text</a>
        
      3. Image Link

        <a href="https://www.example.com/webpage.html"><img src="/img/keyword.jpg" alt="keyword" width="100" height="100"></a>
        

      Best Practices

      • Preference: HTML links over JavaScript
      • Use "nofollow" for paid links and un-trusted content
      • For image links, the alt attribute serves as anchor text

      5. HTTP Status Codes

      • 200OK/Success
      • 301Permanent Redirect
      • 302Temporary Redirect
      • 404Not Found
      • 410Gone (permanently removed)
      • 500Server Error
      • 503Unavailable (retry later)

      6. Webmaster Tools

      1. Google Webmaster Tools - https://www.google.com/webmasters/tools/home
      2. Bing Webmaster Tools - http://www.bing.com/toolbox/webmaster/
      3. Yandex Webmaster - https://webmaster.yandex.com/

      7. Canonicalization

      Common Duplicate Homepage URLs

      • https://www.example.com
      • https://example.com
      • https://www.example.com/index.html
      • https://example.com/index.html
      • https://example.com/index.html&sessid=123

      Canonicalized URL Best Practices

      • Preferred URL = https://example.com/
      • Place the following in <head> section to indicate preferred URL:
      • <link href="https://example.com/" rel="canonical" />

      8. URL Best Practices
      0_1543928143776_5248a308-2daf-4ec2-80f4-5e474cb50c33-image.png

      SEO Tips for URLs

      • Choose shorter, human-readable URLs with descriptive keywords
      • Exclude dynamic parameters when possible (see Canonicalization and Pagination)
      • When possible, place content on the same subdomain to preserve authority
      • Recommended: https://example.com/blog
      • Less Ideal: https://blog.example.com

      I'll post next part asap.
      Thank you all for your time in reading this!

      posted in Web Development
      dev_lak
      dev_lak
    • AngularJS Guide Part 1 - English

      0_1545405228808_angularjs.jpg

      Angular JS is a client side MVC/MVVM Framework, this is created by google so most of developers adopted to angular js. This is very popular for single page web applications and also we can do lot of things using angular js. Ionic framework is best example that showing power of angular which is used to make Hybrid Mobile Applications using HTML, CSS and Javascripts only.

      To install the Angular JS we want Node JS on our computer, and we use Angular CLI to create, test, build and deploy our angular app.

      Installing Node JS


      www.nodejs.org go to this website and download right package match to your OS. You can find out instructions on that page

      Installing Angular


      After installing node js we need to install Angular CLI, to install that open your terminal and run

      npm install -g @angular/cli
      

      Creating an Angular App


      After installing Angular CLI, navigate to where you want to create angular project and then run following command in the terminal

      ng new my-app //my-app is your project name
      

      When you run this command it will ask you information about your app, for now just press enter, we can change these info later

      Running our Angular App


      Navigate to your app directory

      cd my-app
      

      After you navigating to app folder you can run your app using ng-serve command. When you run this command it will start a local server and when you made a change it will automatically reloads the app(auto reloading) this is a very useful feature.

      ng serve --open
      

      When you run above command it will automatically open the app using default web browser(http://localhost:4200/), if not try rerunning the command. On successful execution you can see like below

      0_1545407172540_1545302907665-app-works.png

      On the next step i'll show you how to edit our app. If you have any question just ask on lankadevelopers.com our members will help you.

      Originally posted by @ciaompe
      This is translated cause of most peoples are requesting an english version.

      Source : https://angular.io/guide/quickstart

      posted in Front-End Development
      dev_lak
      dev_lak
    • RE: App for Lanka Developers Community

      we are developing an API library for lankadevelopers once done we will create a public repository, then you can contribute to our repository. We are planing to create app using React Native. Thank you for your suggesting such a great idea.

      Made with :hearts: in Sri Lanka

      posted in General Discussion
      dev_lak
      dev_lak
    • NPM Package to Generate Keystores

      Hello guys,

      I just published a NPM package to create keystore files simply for sign apk's, to generate a keystore, generally we use large command like below,

      keytool -genkey -v -keystore my-release-key.keystore -alias alias_name -keyalg RSA -keysize 2048 -validity 10000

      within this package we just run simple command with two arguments like below,

      kg key generate

      It's pretty simple, star my github repo if you're love this package.
      Installation guide can found on npm package page and github repo.

      https://www.npmjs.com/package/keystore-generator

      https://github.com/codingwithmrdev/keystore-generator

      Thank you.

      posted in Mobile Application Development
      dev_lak
      dev_lak
    • Basic SEO for Web Developers Part 2

      1. Robots Exclusion Standard

      • Robots.txt
      Location: https://example.com/robots.txt
      
      User-agent: googlebot
      Disallow: /example.html
      Sitemap: https://example.com/sitemap.xml
      
      ##More information at http://www.robotstxt.org/robotstxt.html
      
      • X-Robots
      Location: Sent in the HTTP headers
      
      X-Robots-Tag: noindex
      
      ##More information at http://noarchive.net/xrobots/
      
      • Meta Robots
      Location: In the html <head>
      
      <meta name="ROBOT NAME" content="ARGUMENTS" />
      
      ##More information athttp://www.robotstxt.org/meta.html
      
      • Robots Best Practices

        1. Only Meta Robots and X-Robots remove URLs from search results
        2. Don't block CSS or JavaScript files with robots.txt
      • Arguments can be:

        1. Nofollow (do not follow links)
        2. Noindex (do not index)
        3. Noarchive (do not archive)
        4. NoODP (Do not show Open Directory Project description)...Or combined (noindex, nofollow)
        5. If the robots <META> tag is not defined, the default is "INDEX,FOLLOW"

      2. Important User Agents

      • For robots.txt, robots meta tags, and X-Robots-Tag

        Googlebot (can be used as default for most Google crawlers)
        Googlebot-News
        Googlebot-Image
        AdsBot-Google
        Baiduspider
        FacebookExternalHit
        Slurp
        Mediapartners-Google (Mobile Adsense) or Mediapartners
        Googlebot-Mobile
        Googlebot-Video
        Bingbot
        Yandexbot
        Applebot
        Twitterbot
        Rogerbot
        

      3. Sitemap Syntax

      • XML Sitemaps

        <?xml version="1.0" encoding="UTF-8"?>
        <urlset xmlns="http://www.sitemaps.org/schemas/sitemap/0.9">
            <url>
                <loc>https://example.com/</loc> 
                <lastmod>2015-01-01</lastmod> 
                <changefreq>monthly</changefreq> 
                <priority>0.9</priority>
            </url> 
        </urlset>
        
      • Sitemap Index File

        <?xml version="1.0" encoding="UTF-8"?>
        <sitemapindex xmlns="http://www.sitemaps.org/schemas/sitemap/0.9">
            <sitemap>
                <loc>https://example.com/sitemap1.xml.gz</loc>
                <lastmod>2015-01-01T18:23:17+00:00</lastmod>
            </sitemap>
            <sitemap>
                <loc>https://example.com/sitemap2.xml.gz</loc>
                <lastmod>2015-01-01</lastmod>
            </sitemap>
        </sitemapindex>
        
      • Default Locations Can Be:

        https://example.com/sitemap.xml
        https://example.com/sitemap.xml.gz
        https://example.com/sitemap.gz
        
      • Other Common Sitemap Types:

        Mobile
        News
        Image
        Video
        

      4. Pagination

      • Use rel="next" andrel="prev" in the <head> sectionto indicate the relationship between paginated URLs

      • First Page - https://example.com/article

        <link rel="next" href="https://example.com/article?pg=2">
        
      • Second Page - https://example.com/article?pg=2

        <link rel="prev" href="https://example.com/article">
        <link rel="next" href="https://example.com/article?pg=3">
        
      • Final Page - https://example.com/article?pg=3

        <link rel="prev" href="https://example.com/article?pg=2">
        
        #More information at http://mz.cm/rel-next
        

      I'll post next part asap.
      Thank you all for your time in reading this!

      posted in Web Development
      dev_lak
      dev_lak
    • Ionic 5 Firebase Email Auth

      In this article i'm going to show you how to integrate firebase email login for ionic apps and pwa's. I'll cover all the basic stuff like login, register, forgot password, logout and profile.

      First i will introduce about firebase and ionic 5.

      What is Firebase

      I'm sure you have heard about firebase before, if not don't worry i'll tell you about firebase. Firebase is a Backend-as-a-Service (BaaS) that started in 2011 and backed by google. The main advantage of using firebase is we don't want to have a server, firebase is the our server, it has rich feature set that can make fully functional dynamic mobile apps without our own API, Database etc… See below for main features of firebase -

      • Analytics
      • Realtime Database
      • Push Notification
      • Authentication
      • Firestore
      • and many more...

      In this article we use firebase authentication feature. Firebase provides many sign-in methods.

      image-20200329220353563.png

      We use Email/Password sign-in method in this article. In next part i will talk about social logins like Google, Facebook.

      What is ionic?

      Ionic is a open source SDK for develop high performance hybrid mobile apps and progressive web apps(PWA). It uses HTML5, CSS, JS technologies to develop apps & pwa's, sounds good, no? With that web technologies you can made powerfull and look and feel beautifull apps for any platform or device.

      Why you should choose hybrid technologies over native apps? because if you develop a native app, for Android you have to use Java and for iOS you have to use Objective C or Swift, you have to develop seperately for each platform. That is very expensive and take lot of time. In that hybrid technologies you can use same codebase for different platforms like Android, iOS, Windows also you can list them on native app stores.

      Steps

      1. Create Firebase Project
      2. Create Ionic 5 app
      3. Connect Ionic app to Firebase
      4. Implementing Email/Password sign-in
      5. Implementing Forgot Password

      Ok, let's start it.

      Step 1 - Firebase Project

      If you have used firebase before you can skip this step, for beginners follow below steps,

      • Go to Firebase Console
      • Sign in with your google account
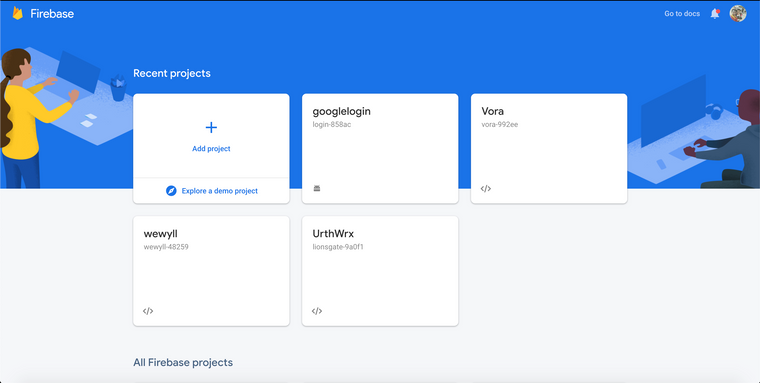
      • Firebase dashboard should look like this

      image-20200329221859778.png

      Then click on **Add Project

      image-20200329222039975.png

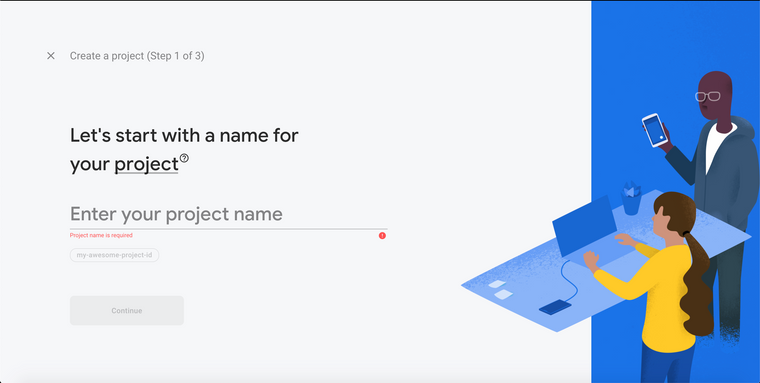
      Enter name for the project and click Continue button, for this project i'm use authapp for project name

      image-20200329222306396.png

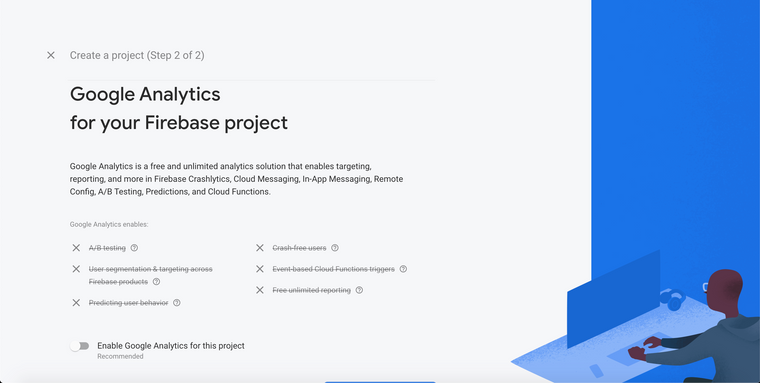
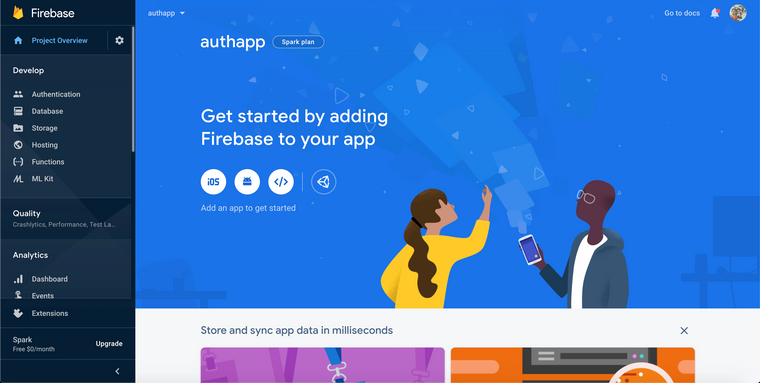
      In next step, disable Enable Google Analytics for this project and click on Create Project button, now go inside the project, it look like this,

      image-20200329222706304.png

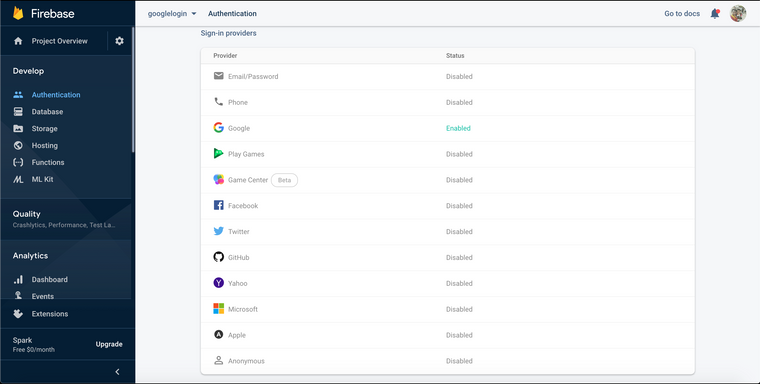
      Now click on Authentication located on left side bar

      image-20200329223406237.png

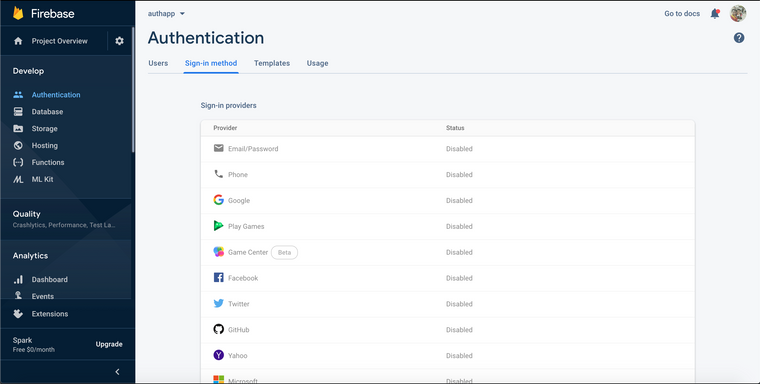
      And click on Sign-in method tab on the top, then enable the Email/Password option

      This step is done.

      Step 2 - Create Ionic 5 app

      To create ionic app, you have to install ionic-cli, nodejs, npm on your machine. If you havent setup those softwares, please follow this link before proceeding.

      Let's create the project, open your terminal and cd to empty directory and enter the following command

      ionic start auth-app blank

      This will generate an blank starter ionic app on our directory, after project creation, run ionic serve to run in on browser.

      Step 3 - Connect Ionic app to Firebase

      First we need to generate firebase configuration for our app, to do this go to firebase console and follow the steps,

      image-20200331212557750.png

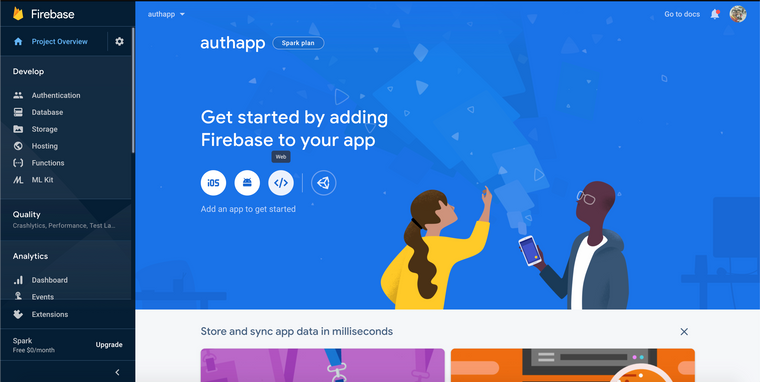
      Click on </> icon on the dashboard,

      image-20200331212703640.png

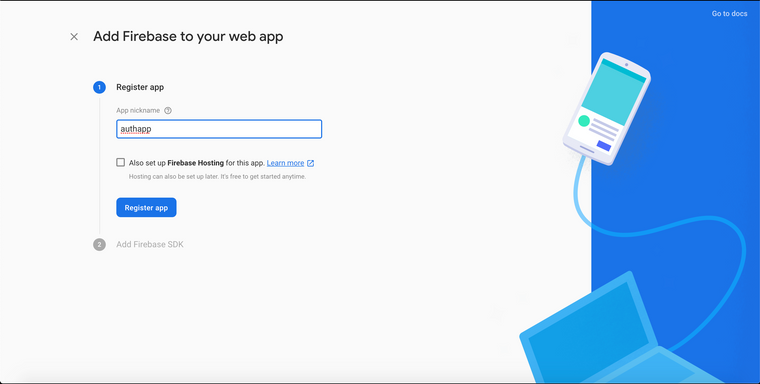
      Give a nickname and click on Register app button

      After copy the below configuration part from the firebase,

      // Your web app's Firebase configuration
        var firebaseConfig = {
          apiKey: "AIzaSyDkq5rm-**************************",
          authDomain: "*****************************",
          databaseURL: "***********************************",
          projectId: "************",
          storageBucket: "************************",
          messagingSenderId: "***********",
          appId: "************************************"
        };
      

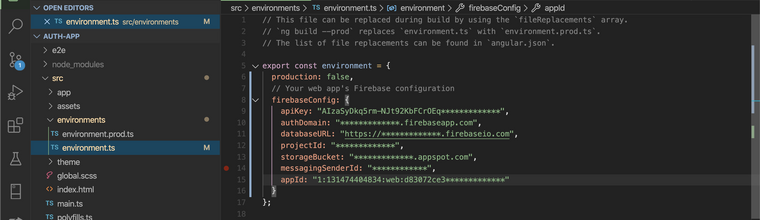
      Now open src/environments/environment.ts & src/environments/environment.prod.ts file and past the configuration just copied,

      image-20200331213532176.png

      To communicate with firebase and use firebase methods we use AngularFire2 package. Install package from npm

      npm i firebase @angular/fire

      Now we have to import Angular Fire Module to our app module, open src/app/app.module.ts ,

      import { NgModule } from '@angular/core';
      import { BrowserModule } from '@angular/platform-browser';
      import { RouteReuseStrategy } from '@angular/router';
      
      import { IonicModule, IonicRouteStrategy } from '@ionic/angular';
      import { SplashScreen } from '@ionic-native/splash-screen/ngx';
      import { StatusBar } from '@ionic-native/status-bar/ngx';
      
      import { AppComponent } from './app.component';
      import { AppRoutingModule } from './app-routing.module';
      
      // Angular Fire Module
      import { AngularFireModule } from '@angular/fire';
      import { AngularFireAuthModule } from '@angular/fire/auth';
      
      import { environment } from '../environments/environment';
      
      @NgModule({
        declarations: [AppComponent],
        entryComponents: [],
        imports: [BrowserModule, IonicModule.forRoot(), AppRoutingModule,
          //Initializing Firebase App
          AngularFireModule.initializeApp(environment.firebaseConfig),
          AngularFireAuthModule
        ],
        providers: [
          StatusBar,
          SplashScreen,
          { provide: RouteReuseStrategy, useClass: IonicRouteStrategy }
        ],
        bootstrap: [AppComponent]
      })
      export class AppModule {}
      

      Now our app able to communicate with firebase app, so we can now proceed to implement Email/Password sign-in.

      Step 4 - Implementing Email/Password sign-in

      For this we need two pages, one for Login other for Register, lets create both pages using ionic cli, run below commands on root of the project,

      ionic g page Login

      ionic g page Register

      Now open login.page.html page and put below code.

      <ion-header>
        <ion-toolbar>
          <ion-buttons slot="start">
            <ion-back-button></ion-back-button>
          </ion-buttons>
          <ion-title>Login</ion-title>
        </ion-toolbar>
      </ion-header>
      
      <ion-content class="ion-padding">
        <ion-item>
          <ion-label position="floating">Email</ion-label>
          <ion-input [(ngModel)]="email"></ion-input>
        </ion-item>
        <ion-item>
          <ion-label position="floating">Password</ion-label>
          <ion-input [(ngModel)]="password"></ion-input>
        </ion-item>
      
        <ion-button expand="block" class="ion-margin-vertical" (click)="login()">LOGIN</ion-button>
      
        <div class="ion-text-center">
          Don't have an account? <span routerLink="/register" routerDirection="forward">Sign-up</span>
        </div>
      </ion-content>
      

      It will looks like this,

      Now open register.page.html and put below code,

      <ion-header>
        <ion-toolbar>
          <ion-buttons slot="start">
            <ion-back-button></ion-back-button>
          </ion-buttons>
          <ion-title>Register</ion-title>
        </ion-toolbar>
      </ion-header>
      
      <ion-content class="ion-padding">
        <ion-item>
          <ion-label position="floating">Email</ion-label>
          <ion-input [(ngModel)]="email"></ion-input>
        </ion-item>
        <ion-item>
          <ion-label position="floating">Password</ion-label>
          <ion-input [(ngModel)]="password"></ion-input>
        </ion-item>
      
        <ion-button expand="block" class="ion-margin-vertical" (click)="register()">REGISTER</ion-button>
      
        <div class="ion-text-center">
          Already have an account? <span routerLink="/login" routerDirection="backward">Sign-in</span>
        </div>
      </ion-content>
      

      Now open login.page.ts and put below code

      import { Component, OnInit } from '@angular/core';
      import { AngularFireAuth } from '@angular/fire/auth';
      import { Router } from '@angular/router';
      import { AlertController } from '@ionic/angular';
      
      @Component({
        selector: 'app-login',
        templateUrl: './login.page.html',
        styleUrls: ['./login.page.scss'],
      })
      export class LoginPage implements OnInit {
      
        email: any;
        password: any;
      
        constructor(
          private fireauth: AngularFireAuth,
          private router: Router,
          private alertCtrl: AlertController
        ) { }
      
        ngOnInit() {
        }
      
        login() {
          this.fireauth.auth.signInWithEmailAndPassword(this.email, this.password)
            .then((res) => {
              if (res.user) {
                // Login Success
                this.router.navigate(['home']);
              }
            }).catch((err) => {
              let msg = err.message;
      
              this.presentAlert("Error", msg);
            })
        }
      
        async presentAlert(header, msg) {
          const alert = await this.alertCtrl.create({
            header: header,
            message: msg,
            buttons: ['OK']
          });
      
          await alert.present();
        }
      
      }
      

      Now open register.page.ts

      import { Component, OnInit } from '@angular/core';
      import { AngularFireAuth } from '@angular/fire/auth';
      import { Router } from '@angular/router';
      import { AlertController } from '@ionic/angular';
      
      @Component({
        selector: 'app-register',
        templateUrl: './register.page.html',
        styleUrls: ['./register.page.scss'],
      })
      export class RegisterPage implements OnInit {
      
        email: any;
        password: any;
      
        constructor(
          private fireauth: AngularFireAuth,
          private router: Router,
          private alertCtrl: AlertController
        ) { }
      
        ngOnInit() {
        }
      
        register() {
          this.fireauth.auth.createUserWithEmailAndPassword(this.email, this.password)
            .then((res) => {
              if (res.user) {
                // Register Success
                this.router.navigate(['home']);
              }
            }).catch((err) => {
              let msg = err.message;
      
              this.presentAlert("Error", msg);
            })
        }
      
        async presentAlert(header, msg) {
          const alert = await this.alertCtrl.create({
            header: header,
            message: msg,
            buttons: ['OK']
          });
      
          await alert.present();
        }
      
      }
      

      Now open home.page.html

      <ion-header [translucent]="true">
        <ion-toolbar>
          <ion-title>
            Home
          </ion-title>
        </ion-toolbar>
      </ion-header>
      
      <ion-content class="ion-padding">
        <strong>Welcome</strong>
          
        <ion-button expand="block" class="ion-margin-vertical" (click)="logout()">LOG OUT</ion-button>
      </ion-content>
      

      Now open home.page.ts

      import { Component } from '@angular/core';
      import { AngularFireAuth } from '@angular/fire/auth';
      import { Router } from '@angular/router';
      import { AlertController } from '@ionic/angular';
      
      @Component({
        selector: 'app-home',
        templateUrl: 'home.page.html',
        styleUrls: ['home.page.scss'],
      })
      export class HomePage {
      
        constructor(
          private fireauth: AngularFireAuth,
          private router: Router,
          private alertCtrl: AlertController
        ) {}
      
        logout() {
          this.fireauth.auth.signOut()
            .then(() => {
              this.router.navigate(['login']);
            })
            .catch((err) => {
              let msg = err.message;
      
              this.presentAlert("Failed", msg);
            });
        }
      
        async presentAlert(header, msg) {
          const alert = await this.alertCtrl.create({
            header: header,
            message: msg,
            buttons: ['OK']
          });
      
          await alert.present();
        }
      }
      

      Now open app-routing.module.ts, made changes like below

      import { NgModule } from '@angular/core';
      import { PreloadAllModules, RouterModule, Routes } from '@angular/router';
      
      const routes: Routes = [
        { path: '', redirectTo: 'login', pathMatch: 'full' },
        { path: 'home', loadChildren: () => import('./home/home.module').then( m => m.HomePageModule)},
        {
          path: 'login',
          loadChildren: () => import('./login/login.module').then( m => m.LoginPageModule)
        },
        {
          path: 'register',
          loadChildren: () => import('./register/register.module').then( m => m.RegisterPageModule)
        },
      ];
      
      @NgModule({
        imports: [
          RouterModule.forRoot(routes, { preloadingStrategy: PreloadAllModules })
        ],
        exports: [RouterModule]
      })
      export class AppRoutingModule { }
      

      Ok now we're done with firebase email sign-in & sign-out, now you can run the app by ionic serve and check our work, in future article i'll cover other more features of firebase auth, stay tuned.

      posted in Hybrid App Development
      dev_lak
      dev_lak
    • Ionic Login UI - Speed Code

      thumbnail.png
      We design 3 screens first one is a welcome screen like then user open your app it shows then users have two options, if he has an account then press the login button and it just move him to the login screen or if he or she don't have an account then press signup button its direct to the signup screen.

      Check it on My Youtube Channel :point_down: :point_down:
      https://youtu.be/18r03PpxtPk

      Source Code - https://github.com/gihan667/ionic-login-ui

      Give me support by doing below :point_down: :point_down:
      ✅ Subscribe ✅ Share ✅ Comment & Stay Connected!

      posted in Mobile Application Development
      dev_lak
      dev_lak
    • Flutter Web Tutorial

      Let's create Landing Page using Flutter

      thumb.png-1.jpg

      Watch on YouTube :point_down:
      https://youtu.be/PM-ASOgxBn8

      Source code link can found on video description.

      Make sure to Like + Subscribe us to get more!

      posted in Web Development
      dev_lak
      dev_lak
    • Lanka Developer Official Discord Channel

      Hi Developers,

      We have create a Discord channel on member request to hang out each other, join to our channel by below link

      Link - https://discord.gg/kqtm6ha

      <Happy Coding>

      posted in Announcements
      dev_lak
      dev_lak
    • Need Flutter Developer & Node JS Developer

      We need Experienced 1 Flutter Developer & 1 Node JS developer for a freelance project.

      • Project Time 2Months (Deadline is Fixed cannot extend)
      • Good experience in Flutter, Provider State Management Required
      • Rest API developing skills required for NodeJS Position
      • AWS S3, Aroga Implementation

      If you're interested drop a message to whats app - 077 55 80 646

      Thanks.

      posted in Job Portal
      dev_lak
      dev_lak
    • Ionic ecommerce Full App UI

      thumbnail (1).png

      I started Ionic E-Commerce app full ui speed code series on my youtube channel.

      Episodes


      EPISODE 1 - Welcome & Auth Screen (https://youtu.be/IKsY_QYdfcs)
      EPISODE 2 - Home Screen & Side Menu (https://youtu.be/Mw_hdIaSsxs)
      EPISODE 3 - Product Details Screen & Cart Page (https://youtu.be/OQXJrkilpYo)
      EPISODE 4 - Profile, My Orders & Favorite Pages (https://youtu.be/vM4L4WegEwc)
      EPISODE 5 - Order Confirm & Checkout Pages (https://youtu.be/wk5BI1dNgZA)

      Source Code - https://github.com/gihan667/ionic-ecommerce-app

      Coming up episodes will be updated here, stay connected.

      Give me support by 👇 👇
      ✅ Subscribe ✅ Share ✅ Comment & Stay Connected!

      posted in Mobile Application Development
      dev_lak
      dev_lak
    • RE: Help me on Payment Gateway in PHP

      @Theesan in this doc, they have 4 checkout models, first decide what is suitable model for you,

      1. Hosted Checkout
      2. Hosted Session
      3. Direct Payment
      4. Batch

      and then read the relavant integration guid,
      and also this doc has some sample codes, see this - https://test-gateway.mastercard.com/api/documentation/downloads/index.html?locale=en_US

      posted in Web Development
      dev_lak
      dev_lak
    • RE: We are celebrating our 2nd anniversary.

      Happy Anniversary Boys :heart_eyes:

      posted in Announcements
      dev_lak
      dev_lak
    • RE: Android සිංහලෙන් Video Series

      @Sahan-Pasindu-Nirmal sahan niyama wadak machn, digtm karan plyn 😍😍

      posted in Android Development
      dev_lak
      dev_lak
    • 1
    • 2
    • 3
    • 4
    • 5
    • 6
    • 7
    • 8
    • 1 / 8