@cody elama
Posts made by dev_lak
-
NPM Package to Generate Keystoresposted in Mobile Application Development
Hello guys,
I just published a NPM package to create keystore files simply for sign apk's, to generate a keystore, generally we use large command like below,
keytool -genkey -v -keystore my-release-key.keystore -alias alias_name -keyalg RSA -keysize 2048 -validity 10000within this package we just run simple command with two arguments like below,
kg key generateIt's pretty simple, star my github repo if you're love this package.
Installation guide can found on npm package page and github repo.https://www.npmjs.com/package/keystore-generator
https://github.com/codingwithmrdev/keystore-generator
Thank you.

-
Use Eloquent ORM in PHP projects without Laravelposted in Web Development
When talking about Laravel Framework, Eloquent is a one of best part of the framework, have you ever thought of using Eloquent without entire Laravel framework? In this post i'm teaching you how to use Eloquent ORM without Laravel Framework, i'll create simple form using Eloquent. Let's dive,
Required Environment
- Windows/Mac or Linux
- Apache server
- PHP 7+
Setting up Eloquent in PHP
First move to empty folder on public directory and run below command on terminal.
composer require illuminate/databaseThis will generate
composer.jsonand installeloquentdependency on our project directory.After command successful, create a new file and name it
bootstrap.phpand put below code in it,<?php require "vendor/autoload.php"; use Illuminate\Database\Capsule\Manager as Capsule; $capsule = new Capsule; // Mysql serve credentials $capsule->addConnection([ "driver" => "mysql", "host" =>"127.0.0.1", "database" => "ums", "username" => "root", "password" => "123" ]); // Making Capsule instance available globally $capsule->setAsGlobal(); // Booting the Eloquent ORM $capsule->bootEloquent();The code requiring composer autoload class and importing Eloquent Manager and making it's instance called
$capsule. In next line we setting database connection and making it available globally using$capsuleinstance, finally we're booting the Eloquent ORM.After this create a database on your localhost and name it ums
Creating Migrations
Migration is used to build your application database schema, in Laravel we use artisan commands to generate migrations and run them, so let's see how we can use migrations without Laravel Framework and artisan commands.
Now create a folder called
databaseand createuser_table_migration.phpinside the newly created folder and put below code<?php require "../bootstrap.php"; use Illuminate\Database\Capsule\Manager as Capsule; Capsule::schema()->create('users', function ($table) { $table->increments('id'); $table->string('name'); $table->string('email')->unique(); $table->string('password'); $table->timestamps(); });You can see a some similarity of this code and what we would write in Laravel, the difference is the
schemais reference fromCapsuleclass.Now our migration for
userstable is ready, to run this migration simply openuser_table_migration.phpfile on browser if you see a blank page, it means script executed successfully, to verify check your database, there should beuserstable created.Note - Since these migration scripts publicly available, this is not suitable for Production use
Creating Models
Let's see how we implement Eloquent Models, first create a new folder and name it models, then open
composer.jsonand edit it like below code{ "require": { "illuminate/database": "^7.5" }, "autoload": { "classmap": [ "models" ] } }This will add our models folder as autoload, now create a new file inside models folder and name it
User.php<?php use Illuminate\Database\Eloquent\Model as Eloquent; class User extends Eloquent { /** * The attributes that are mass assignable. * * @var array */ protected $fillable = [ 'name', 'email', 'password' ]; /** * The attributes that should be hidden for arrays. * * @var array */ protected $hidden = [ 'password', ]; }Now our Eloquent Models are ready to use, let's create form to insert data.
Create a new file in the root of the project and name it
index.php, then put below code<?php session_start(); $error = isset($_SESSION['error']) ? $_SESSION['error']:true; ?> <!DOCTYPE html> <html lang="en"> <head> <meta charset="UTF-8"> <meta name="viewport" content="width=device-width, initial-scale=1.0"> <title>Create User</title> <link rel="stylesheet" href="https://stackpath.bootstrapcdn.com/bootstrap/4.4.1/css/bootstrap.min.css" integrity="sha384-Vkoo8x4CGsO3+Hhxv8T/Q5PaXtkKtu6ug5TOeNV6gBiFeWPGFN9MuhOf23Q9Ifjh" crossorigin="anonymous"> <style> #bg-cover { background-size: cover; height: 100%; text-align: center; display: flex; align-items: center; position: relative; } #bg-cover-caption { width: 100%; position: relative; z-index: 1; } /* background overlay */ form:before { content: ''; height: 100%; left: 0; position: absolute; top: 0; width: 100%; background-color: rgba(0,0,0,0.3); z-index: -1; border-radius: 10px; } </style> </head> <body> <section id="bg-cover" class="min-vh-100"> <div id="bg-cover-caption"> <div class="container"> <div class="row text-white"> <div class="col-xl-5 col-lg-6 col-md-8 col-sm-10 mx-auto text-center form p-4"> <h1 class="display-4 py-2 text-truncate">Create User</h1> <div class="px-2"> <form action="save_user.php" method="POST" class="justify-content-center"> <div class="form-group"> <label class="sr-only">Name</label> <input type="text" name="name" class="form-control" placeholder="Name" required> </div> <div class="form-group"> <label class="sr-only">Email</label> <input type="email" name="email" class="form-control" placeholder="Email" required> </div> <div class="form-group"> <label class="sr-only">Password</label> <input type="password" name="password" class="form-control" placeholder="Password" required> </div> <button type="submit" class="btn btn-primary btn-lg">Create</button> <?php if ($error == false) { echo '<span>User added</span>'; } ?> </form> </div> </div> </div> </div> </div> </section> <script src="https://code.jquery.com/jquery-3.4.1.slim.min.js" integrity="sha384-J6qa4849blE2+poT4WnyKhv5vZF5SrPo0iEjwBvKU7imGFAV0wwj1yYfoRSJoZ+n" crossorigin="anonymous"></script> <script src="https://cdn.jsdelivr.net/npm/[email protected]/dist/umd/popper.min.js" integrity="sha384-Q6E9RHvbIyZFJoft+2mJbHaEWldlvI9IOYy5n3zV9zzTtmI3UksdQRVvoxMfooAo" crossorigin="anonymous"></script> <script src="https://stackpath.bootstrapcdn.com/bootstrap/4.4.1/js/bootstrap.min.js" integrity="sha384-wfSDF2E50Y2D1uUdj0O3uMBJnjuUD4Ih7YwaYd1iqfktj0Uod8GCExl3Og8ifwB6" crossorigin="anonymous"></script> </body> </html>Here i'm using bootstrap for frontend, now our form is ready. Then we need another php script to handle form submit so create another file and name it
save_user.phpand put below code,<?php ini_set('display_errors', 1); ini_set('display_startup_errors', 1); error_reporting(E_ALL); session_start(); require "bootstrap.php"; $name = $_POST['name']; $email = $_POST['email']; $password = password_hash($_POST['password'], PASSWORD_BCRYPT); $user = User::create([ 'name' => $name, 'email' => $email, 'password' => $password, ]); $_SESSION['error'] = false; header('Location: index.php');This will handle our form submit event and insert the data to database using Eloquent. Finally open your terminal and run below command,
composer dump-autoload -oThis will generate optimised autoload files for our project. Now open
index.phpfrom browser and enter some info into form and see what happened.Project files can found here
-
RE: php emailposted in General Discussion
phpmailer use karanna,
https://github.com/PHPMailer/PHPMailer
-
Deploy your Ionic 4/5 as a Web app on Firebaseposted in Web Development
Hello guys, in this post i'll show you how to deploy your ionic 4/5 app as a web app on Firebase.
In this tutorial i'm assuming you have installed firebase-tools and you have created firebase project on firebase console.
Let's dive :swimmer:
-
Open your terminal and cd to your root of ionic project
-
Then run
ionic build —prod —release -
If you want to run and see before deploying you can install
http-serverfrom npm and run,cd www/http-server .
-
Then initilize firebase by running
firebase init
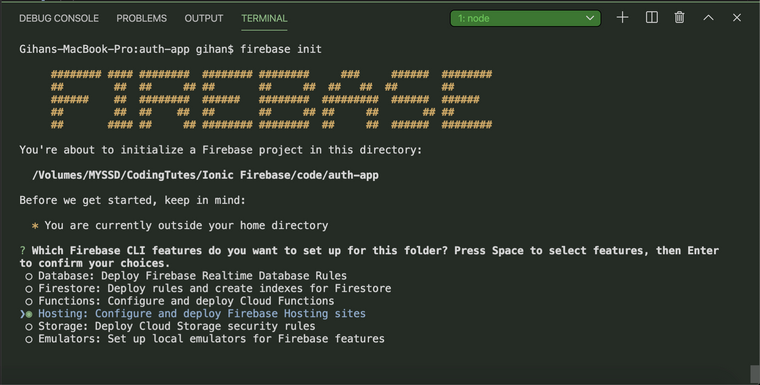
Choose Hosting: Configure and deploy Firebase Hosting sites option (press space bar to choose) and press Enter
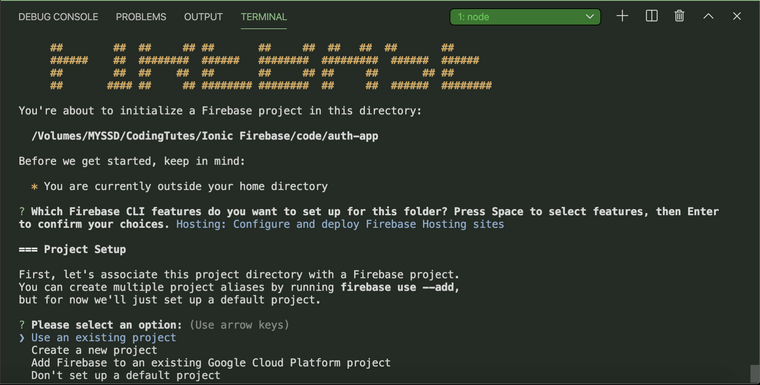
Now choose Use an existing project and select your project
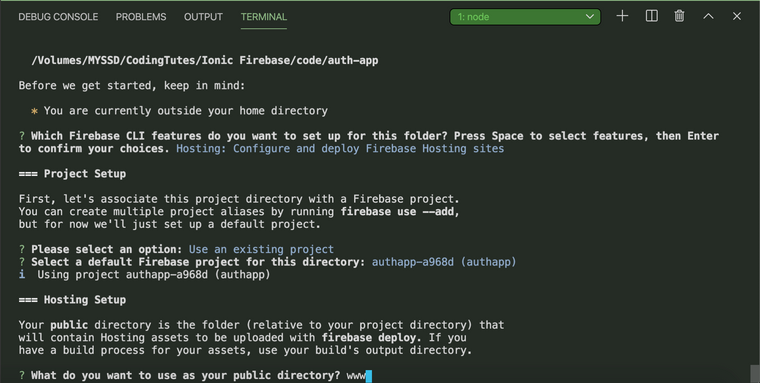
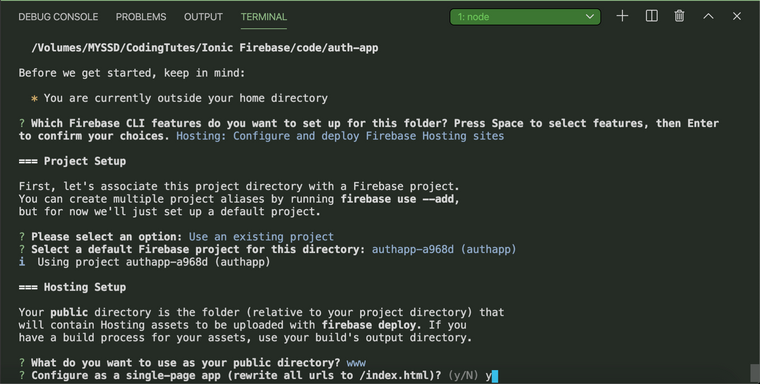
For this enter www as public directory
-
For next question enter **y **and for final question enter N.
Now firebase has initilized on our project directory, you will see two nes files as firebase.json & .firebaserc, it means firebase has initialised, let's move on
-
Now run
firebase deploythis command will deploy our app to firebase, after successfull deploy you will see like below.
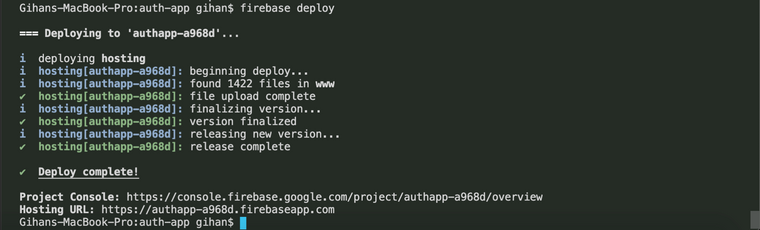
Visit your newly hosted web app by going to **Hosting URL
-
-
RE: Firebase Cloud function to send emails via SendGridposted in Programming
@Sahan-Pasindu-Nirmal said in Firebase Cloud function to send emails via SendGrid:
ස්තුතියි. onCreate වගේ වෙන එකක්ද functions.https.onRequest කියන්නේ?
ow, https.onRequest kyanne http request ekak awama execute wena method ekak
-
Firebase Cloud function to send emails via SendGridposted in Programming
In this post i'm showing you how to send emails via firebase cloud functions by SendGrid. SendGrid is a cloud based email service it has free tier which will help you to begin. Also we have to enable firebase billing to work this correctly, because firebase free plan only allow google services for outbound networking.
For this tutorial i'm assuming you have installed firebase sdk and log into your firebase account.
Setting up things
- Open terminal & run
firebase initto initilize firebase functions - We need two packages for this, add them via npm
npm install @sendgrid/mailnpm install cors
- Now open index.js and put below code.
const functions = require('firebase-functions'); const admin = require('firebase-admin'); admin.initializeApp(); const SENDGRID_API_KEY = "PUT_YOUR_SENDGRID_API_KEY"; const sgMail = require('@sendgrid/mail'); const cors = require("cors")({ origin: true }); exports.sendEmail = functions.https.onRequest((req, res) => { return cors(req, res, () => { const msg = { to: req.body.email, from: '[email protected]', subject: 'SUBJECT', templateId: 'd-02d153b9f48f490bb73bfcc6ad92d892', //SendGrid Template ID // SendGrid Template Variables dynamic_template_data: { name: req.body.name, event_name: req.body.event, date: req.body.date } }; sgMail.send(msg).then(res => { res.send({ success: true, message: res }); }).catch(err => { res.send({ success: false, error: err }); }); }); });- Now deploy our function by running
firebase deploy --only functions
NOTE - To work this correctly, you must enable billing on your firebase account
- Open terminal & run
-
Ionic 5 Firebase Email Authposted in Hybrid App Development
In this article i'm going to show you how to integrate firebase email login for ionic apps and pwa's. I'll cover all the basic stuff like login, register, forgot password, logout and profile.
First i will introduce about firebase and ionic 5.
What is Firebase
I'm sure you have heard about firebase before, if not don't worry i'll tell you about firebase. Firebase is a Backend-as-a-Service (BaaS) that started in 2011 and backed by google. The main advantage of using firebase is we don't want to have a server, firebase is the our server, it has rich feature set that can make fully functional dynamic mobile apps without our own API, Database etc… See below for main features of firebase -
- Analytics
- Realtime Database
- Push Notification
- Authentication
- Firestore
- and many more...
In this article we use firebase authentication feature. Firebase provides many sign-in methods.
We use Email/Password sign-in method in this article. In next part i will talk about social logins like Google, Facebook.
What is ionic?
Ionic is a open source SDK for develop high performance hybrid mobile apps and progressive web apps(PWA). It uses HTML5, CSS, JS technologies to develop apps & pwa's, sounds good, no? With that web technologies you can made powerfull and look and feel beautifull apps for any platform or device.
Why you should choose hybrid technologies over native apps? because if you develop a native app, for Android you have to use Java and for iOS you have to use Objective C or Swift, you have to develop seperately for each platform. That is very expensive and take lot of time. In that hybrid technologies you can use same codebase for different platforms like Android, iOS, Windows also you can list them on native app stores.
Steps
- Create Firebase Project
- Create Ionic 5 app
- Connect Ionic app to Firebase
- Implementing Email/Password sign-in
- Implementing Forgot Password
Ok, let's start it.
Step 1 - Firebase Project
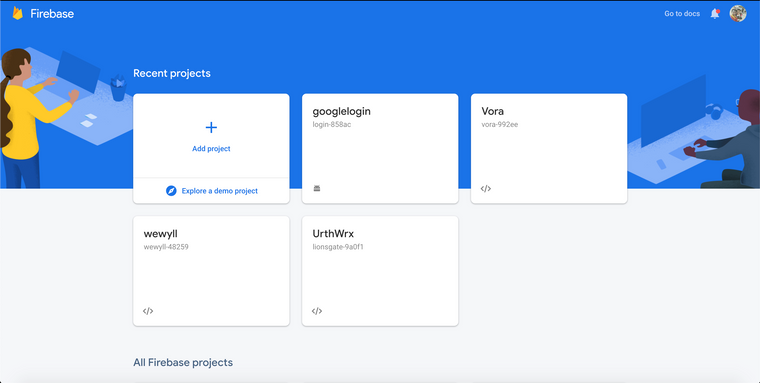
If you have used firebase before you can skip this step, for beginners follow below steps,
- Go to Firebase Console
- Sign in with your google account
- Firebase dashboard should look like this
Then click on **Add Project
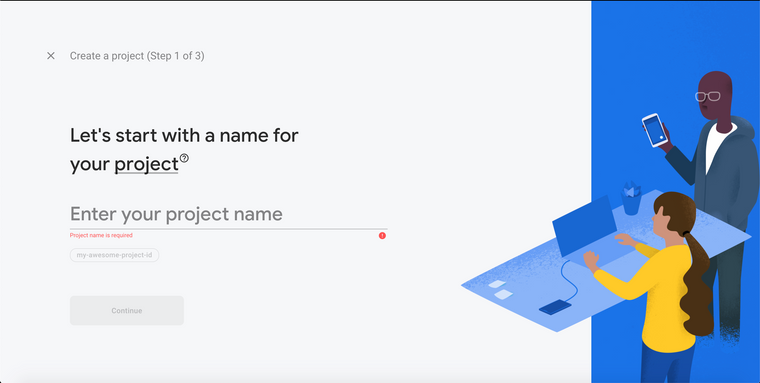
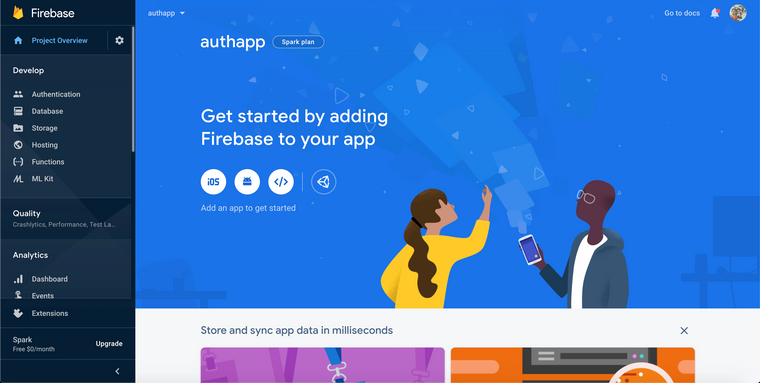
Enter name for the project and click Continue button, for this project i'm use authapp for project name
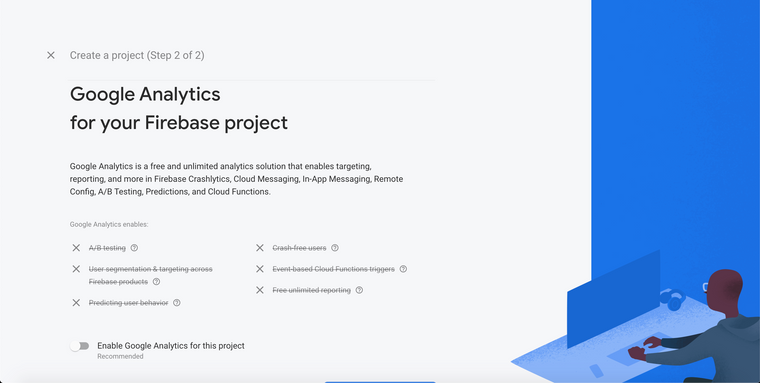
In next step, disable Enable Google Analytics for this project and click on Create Project button, now go inside the project, it look like this,
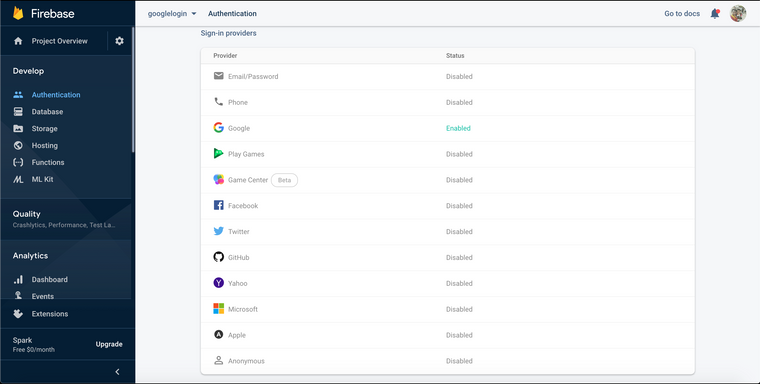
Now click on Authentication located on left side bar
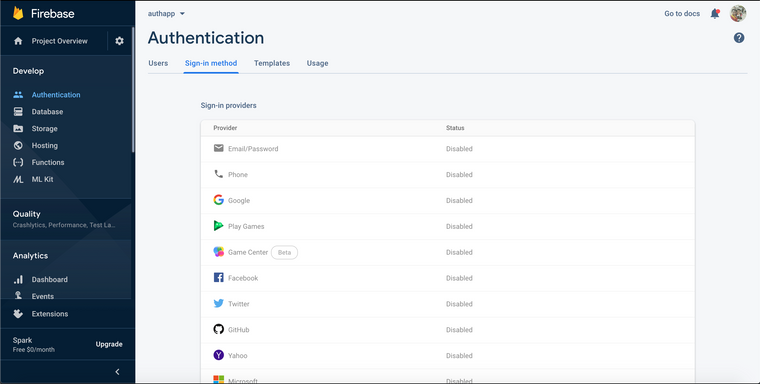
And click on Sign-in method tab on the top, then enable the Email/Password option
This step is done.
Step 2 - Create Ionic 5 app
To create ionic app, you have to install ionic-cli, nodejs, npm on your machine. If you havent setup those softwares, please follow this link before proceeding.
Let's create the project, open your terminal and cd to empty directory and enter the following command
ionic start auth-app blankThis will generate an blank starter ionic app on our directory, after project creation, run
ionic serveto run in on browser.Step 3 - Connect Ionic app to Firebase
First we need to generate firebase configuration for our app, to do this go to firebase console and follow the steps,
Click on </> icon on the dashboard,
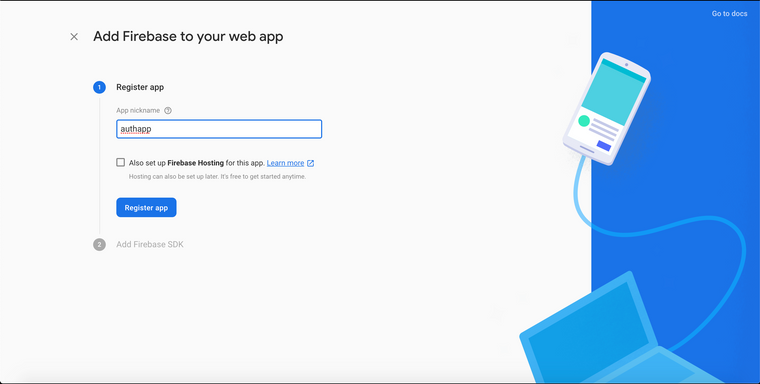
Give a nickname and click on Register app button
After copy the below configuration part from the firebase,
// Your web app's Firebase configuration
  var firebaseConfig = {
    apiKey: "AIzaSyDkq5rm-**************************",
    authDomain: "*****************************",
    databaseURL: "***********************************",
    projectId: "************",
    storageBucket: "************************",
    messagingSenderId: "***********",
    appId: "************************************"
  };
Now open
src/environments/environment.ts&src/environments/environment.prod.tsfile and past the configuration just copied,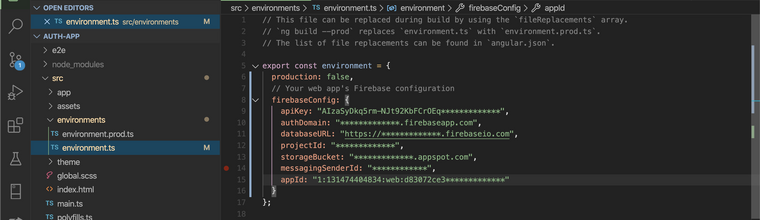
To communicate with firebase and use firebase methods we use AngularFire2 package. Install package from npm
npm i firebase @angular/fireNow we have to import Angular Fire Module to our app module, open
src/app/app.module.ts,import { NgModule } from '@angular/core'; import { BrowserModule } from '@angular/platform-browser'; import { RouteReuseStrategy } from '@angular/router'; import { IonicModule, IonicRouteStrategy } from '@ionic/angular'; import { SplashScreen } from '@ionic-native/splash-screen/ngx'; import { StatusBar } from '@ionic-native/status-bar/ngx'; import { AppComponent } from './app.component'; import { AppRoutingModule } from './app-routing.module'; // Angular Fire Module import { AngularFireModule } from '@angular/fire'; import { AngularFireAuthModule } from '@angular/fire/auth'; import { environment } from '../environments/environment'; @NgModule({ declarations: [AppComponent], entryComponents: [], imports: [BrowserModule, IonicModule.forRoot(), AppRoutingModule, //Initializing Firebase App AngularFireModule.initializeApp(environment.firebaseConfig), AngularFireAuthModule ], providers: [ StatusBar, SplashScreen, { provide: RouteReuseStrategy, useClass: IonicRouteStrategy } ], bootstrap: [AppComponent] }) export class AppModule {}Now our app able to communicate with firebase app, so we can now proceed to implement Email/Password sign-in.
Step 4 - Implementing Email/Password sign-in
For this we need two pages, one for Login other for Register, lets create both pages using ionic cli, run below commands on root of the project,
ionic g page Loginionic g page RegisterNow open login.page.html page and put below code.
<ion-header>
  <ion-toolbar>
    <ion-buttons slot="start">
      <ion-back-button></ion-back-button>
    </ion-buttons>
    <ion-title>Login</ion-title>
  </ion-toolbar>
</ion-header>

<ion-content class="ion-padding">
  <ion-item>
    <ion-label position="floating">Email</ion-label>
    <ion-input [(ngModel)]="email"></ion-input>
  </ion-item>
  <ion-item>
    <ion-label position="floating">Password</ion-label>
    <ion-input [(ngModel)]="password"></ion-input>
  </ion-item>

  <ion-button expand="block" class="ion-margin-vertical" (click)="login()">LOGIN</ion-button>

  <div class="ion-text-center">
    Don't have an account? <span routerLink="/register" routerDirection="forward">Sign-up</span>
  </div>
</ion-content>
It will looks like this,
Now open register.page.html and put below code,
<ion-header>
  <ion-toolbar>
    <ion-buttons slot="start">
      <ion-back-button></ion-back-button>
    </ion-buttons>
    <ion-title>Register</ion-title>
  </ion-toolbar>
</ion-header>

<ion-content class="ion-padding">
  <ion-item>
    <ion-label position="floating">Email</ion-label>
    <ion-input [(ngModel)]="email"></ion-input>
  </ion-item>
  <ion-item>
    <ion-label position="floating">Password</ion-label>
    <ion-input [(ngModel)]="password"></ion-input>
  </ion-item>

  <ion-button expand="block" class="ion-margin-vertical" (click)="register()">REGISTER</ion-button>

  <div class="ion-text-center">
    Already have an account? <span routerLink="/login" routerDirection="backward">Sign-in</span>
  </div>
</ion-content>
Now open login.page.ts and put below code
import { Component, OnInit } from '@angular/core';
import { AngularFireAuth } from '@angular/fire/auth';
import { Router } from '@angular/router';
import { AlertController } from '@ionic/angular';

@Component({
  selector: 'app-login',
  templateUrl: './login.page.html',
  styleUrls: ['./login.page.scss'],
})
export class LoginPage implements OnInit {

  email: any;
  password: any;

  constructor(
    private fireauth: AngularFireAuth,
    private router: Router,
    private alertCtrl: AlertController
  ) { }

  ngOnInit() {
  }

  login() {
    this.fireauth.auth.signInWithEmailAndPassword(this.email, this.password)
      .then((res) => {
        if (res.user) {
          // Login Success
          this.router.navigate(['home']);
        }
      }).catch((err) => {
        let msg = err.message;

        this.presentAlert("Error", msg);
      })
  }

  async presentAlert(header, msg) {
    const alert = await this.alertCtrl.create({
      header: header,
      message: msg,
      buttons: ['OK']
    });

    await alert.present();
  }

}
Now open register.page.ts
import { Component, OnInit } from '@angular/core';
import { AngularFireAuth } from '@angular/fire/auth';
import { Router } from '@angular/router';
import { AlertController } from '@ionic/angular';

@Component({
  selector: 'app-register',
  templateUrl: './register.page.html',
  styleUrls: ['./register.page.scss'],
})
export class RegisterPage implements OnInit {

  email: any;
  password: any;

  constructor(
    private fireauth: AngularFireAuth,
    private router: Router,
    private alertCtrl: AlertController
  ) { }

  ngOnInit() {
  }

  register() {
    this.fireauth.auth.createUserWithEmailAndPassword(this.email, this.password)
      .then((res) => {
        if (res.user) {
          // Register Success
          this.router.navigate(['home']);
        }
      }).catch((err) => {
        let msg = err.message;

        this.presentAlert("Error", msg);
      })
  }

  async presentAlert(header, msg) {
    const alert = await this.alertCtrl.create({
      header: header,
      message: msg,
      buttons: ['OK']
    });

    await alert.present();
  }

}
Now open home.page.html
<ion-header [translucent]="true">
  <ion-toolbar>
    <ion-title>
      Home
    </ion-title>
  </ion-toolbar>
</ion-header>

<ion-content class="ion-padding">
  <strong>Welcome</strong>

  <ion-button expand="block" class="ion-margin-vertical" (click)="logout()">LOG OUT</ion-button>
</ion-content>
Now open home.page.ts
import { Component } from '@angular/core';
import { AngularFireAuth } from '@angular/fire/auth';
import { Router } from '@angular/router';
import { AlertController } from '@ionic/angular';

@Component({
  selector: 'app-home',
  templateUrl: 'home.page.html',
  styleUrls: ['home.page.scss'],
})
export class HomePage {

  constructor(
    private fireauth: AngularFireAuth,
    private router: Router,
    private alertCtrl: AlertController
  ) {}

  logout() {
    this.fireauth.auth.signOut()
      .then(() => {
        this.router.navigate(['login']);
      })
      .catch((err) => {
        let msg = err.message;

        this.presentAlert("Failed", msg);
      });
  }

  async presentAlert(header, msg) {
    const alert = await this.alertCtrl.create({
      header: header,
      message: msg,
      buttons: ['OK']
    });

    await alert.present();
  }
}
Now open app-routing.module.ts, made changes like below
import { NgModule } from '@angular/core';
import { PreloadAllModules, RouterModule, Routes } from '@angular/router';

const routes: Routes = [
  { path: '', redirectTo: 'login', pathMatch: 'full' },
  { path: 'home', loadChildren: () => import('./home/home.module').then( m => m.HomePageModule)},
  {
    path: 'login',
    loadChildren: () => import('./login/login.module').then( m => m.LoginPageModule)
  },
  {
    path: 'register',
    loadChildren: () => import('./register/register.module').then( m => m.RegisterPageModule)
  },
];

@NgModule({
  imports: [
    RouterModule.forRoot(routes, { preloadingStrategy: PreloadAllModules })
  ],
  exports: [RouterModule]
})
export class AppRoutingModule { }
Ok now we're done with firebase email sign-in & sign-out, now you can run the app by
ionic serveand check our work, in future article i'll cover other more features of firebase auth, stay tuned.
-
RE: Mage laravel website eka MongoDb cluster ekka connect kranna giyama me error eka enava. meka fix karanne kohomada ?posted in Laravel Framework
bro oyage env eke DB_CONNECTION=mongodb_conn' kyna eke anthimata ' ekak wadila, ekai aula